電動ピンホールホイール
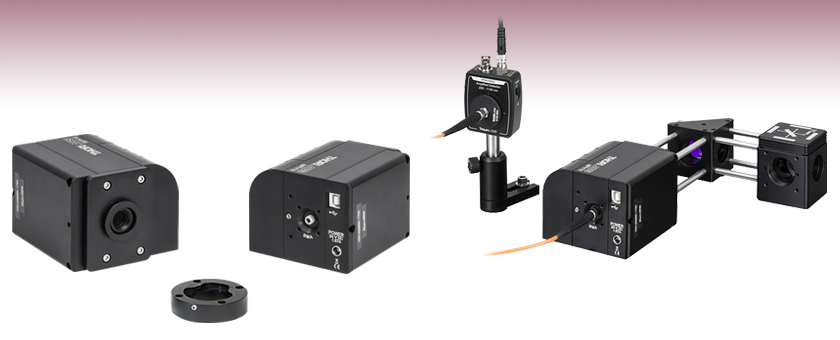
- 16 Pinholes from Ø25 μm to Ø2 mm
- Automated, Repeatable Positioning of Pinholes
- Encoded Motor Eliminates the Need for Realignment
- Uncoated and AR-Coated Options Available
MPH16-A
Motorized Pinhole Wheel,
400 - 700 nm AR-Coated Optics
Dovetail Adapter Included
with Every Pinhole Wheel
for 30 mm Cage Compatibility
MPH16-A Motorized Pinhole Wheel in Confocal Imaging Setup (See the Applications Tab)
Front View
Back View
Application Idea

Please Wait

Click to Enlarge
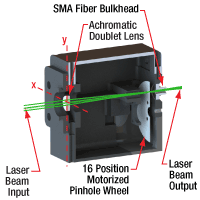
図2:ピンホールホイールの内部(詳細は「仕様」参照)
Click to Enlarge
図1:電動ピンホールホイールの断面図
特長
- 16個のピンホールのサイズ:Ø25 µm~Ø2 mm(詳細は「仕様」タブを覧ください
- コーティング無し、または400~700 nm、650~1050 nmのARコーティング付き
- 迅速で再現性の高いピンホールの位置設定
- 自由空間からの入力部は30 mmケージシステムに対応(付属のアリ溝式アダプタを使用)
- ファイバ出力用のSMAコネクタ付き(コア径Ø400~Ø1000 µmのマルチモードファイバを使用してください)
- 16 mm および30 mm ケージシステムに対応
当社の電動ピンホールホイールは、再現性の高いピンホールの位置決めを自動的に行うことができ、共焦点レーザ走査顕微鏡やレーザ走査検眼鏡などにご利用いただけます。コーティング無しの電動ピンホールホイール、および400~700 nmまたは650~1050 nmのARコーティング付き電動ピンホールホイールをご用意しています。ピンホールホイールは標準的なフォトリソグラフィ技術を用いて製造されたクロムメッキのガラスディスクで、Ø25 µm~Ø2 mmの16個のピンホールがエッチングされています。(「仕様」タブをご覧ください)。ARコーティング付き電動ピンホールホイール内のガラスディスクは、仕様の波長範囲におけるホイールの透過率を向上させるために、両面にコーティングが施されています。
光学式エンコーダ付きモータにより、再アライメントをしなくても、10 µmの分解能でピンホールの移動を再現できます。電動ピンホールホイールは、USBポートでPCに接続して、付属のGUIソフトウェアまたはDLLで制御可能です(「ソフトウェア」タブからダウンロードできます)。図1でご覧いただけるように、電動ピンホールホイールに入射した光はアクロマティック複レンズで集光され、ピンホールホイールを通過します。ピンホールの半径方向の位置は予めアライメントされていますが、GUIからも微調整が可能です。集光レンズの位置(図1のY軸上)は付属の1.5 mm六角レンチで調整できます。ピンホールホイールから出力される光は、SMAコネクタ付きマルチモードファイバに結合することも、自由空間光としてお使いいただくこともできます。ディテクタに接続する場合は、コア径Ø400~Ø1000 µmのSMAコネクタ付きマルチモードファイバーパッチケーブルをご使用ください。これよりも小さい径のファイバを使用すると正確なアライメントができません
こちらの電動ピンホールホイールは、当社の4チャンネル共焦点顕微鏡や倒立顕微鏡Veneto®の共焦点構成にも使用されています。 ピンホールホイールは、カスタム仕様の共焦点顕微鏡システムや、その他の実験セットアップにも組み込み可能です(「用途」タブをご覧ください)。また、ディテクタに焦点を結ぶ光量を調整し、同時に焦点面以外からの信号を減少させることが可能です。厚い試料の場合、ピンホールのサイズは対物レンズのNAに基づいて選びます。厚い試料では焦点面以外からも大きな信号が発生しますが、小さなピンホールを使用することでより高いオプティカルセクショニング効果が得られ、生成される画像の信号対雑音比を向上させることができます。反対に薄い試料の場合は、焦点面以外での光の発生は少ないため、大きなピンホール径を使用することで、ディテクタに到達する光量を増加させることができます。

Click to Enlarge
図5: 16 mmケージシステムが接続された出力部

Click to Enlarge
図4: 自由空間に出力するためにSMAファイバーコネクタを取り外した出力部
Click to Enlarge
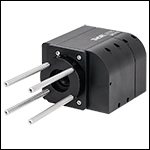
図3: 30 mmケージシステムが接続された入力部
取付け部の特徴
電動ピンホールホイールの入射用および出射用の開口部は、カスタム仕様の実験装置に簡単に組み込めるように設計されています。入射開口部は、当社の共焦点レーザ走査顕微鏡イメージングシステムに結合できるようアリ溝が付いています。付属のアリ溝式アダプタを使用すると30 mmケージシステムに接続できます。それにはまず、付属の#4-40キャップスクリュをザグリ穴に差し込んで30 mmケージ用アセンブリーロッド(別売り)を取り付け、その後ピンホールホイールの入射部にアダプタを取り付けます。図3をご参照ください。また、取付け機能が追加できるよう、ベース部分にはM4および#8-32ネジの両方に対応する取付け穴が2つあります。
出射開口部は、SMAファイバーコネクタが効率良く集光できる状態で予め取り付けられています。ファイバーコネクタを使用した時は、ファイバ端面はピンホールホイールの裏面から1 mmの位置にきます。 SMAファイバーアダプタはスパナレンチSPW801 を使用して取り外せますが(図4参照)、それによって露出したSM05内ネジには当社のØ12 mm~Ø12.7 mm(Ø1/2インチ)レンズチューブを取り付けることができます。また出射開口部の周りには4つの#4-40タップ穴があり、図5のように当社の16 mmケージシステムの取り付けが可能です。
ほかのファイバーコネクターアダプタもご要望に応じて提供可能です。詳細は当社までご連絡ください。
| Item # | MPH16-UC | MPH16-A | MPH16-B |
|---|---|---|---|
| Pinhole Wheel Specifications | |||
| Pinholes | 16 (Ø25 µm to Ø2 mm) | ||
| Substrate (Click for Internal Transmission) | Chrome-Plated Schott D263®a T eco (Data) | ||
| Substrate Thickness | 0.020" (0.508 mm) | ||
| AR Coatingb (Click for Graph) | None | 350 - 700 nm, Ravg < 0.5% (Raw Data) | 650 - 1050 nm, Ravg < 0.5% (Raw Data) |
| Refractive Index | 1.5255 | ||
| Abbe Number (Ve) @ 546 nm | 55 | ||
| Positioning Accuracy | ±5.1 µm | ||
| Achromatic Doublet Specifications | |||
| Item # of Doublet | N/A | AC127-075-A | AC127-075-B |
| Focal Length | 75.0 mm | ||
| AR Coatingc (Click for Graph) | None | 400 - 700 nm, Ravg < 0.5% (Raw Data) | 650 - 1050 nm, Ravg < 0.5% (Raw Data) |
| Focal Length Shift & Transmission Graphs | N/A | ||
| Size | Ø1/2" (Ø12.7 mm) | ||
| Clear Aperture | > Ø11.43 mm | ||
| Surface Quality | 40-20 Scratch-Dig | ||
| General Specifications | |||
| Input Aperture | Ø10 mm | ||
| Recommended Fiber | Multimode Fiber, Ø400 - Ø1000 µm Core, 0.22 NA | ||
| Operating Voltage | 24 VDC, 1.67 A | ||
| Input Power (Max)d | 200 mW/cm2 | ||
| Control | USB Cable, Software, and SDK Includede | ||
| Dimensions | 3.73" x 3.34" x 2.60" (94.8 mm x 84.7 mm x 66.0 mm) | ||
| Weight | 1.0 kg (2.2 lbs) | ||
| Pinhole Wheel | |
|---|---|
| Positiona | Pinhole Size |
| A | Ø50 µm Annular Apertureb |
| B | Ø25 µm |
| C | Ø30 µm |
| D | Ø35 µm |
| E | Ø40 µm |
| F | Ø45 µm |
| G | Ø50 µm |
| H | Ø60 µm |
| I | Ø70 µm |
| J | Ø80 µm |
| K | Ø90 µm |
| L | Ø100 µm |
| M | Ø125 µm |
| N | Ø200 µm |
| O | Ø300 µm |
| P | Ø1000 µm |
| Q | Ø2000 µm |

Click to Enlarge
ピンホールホイールのピンホールサイズは16種類あります。左の表をご覧ください。ピンホールホイールMPH16-UCはARコーティング無し、MPH16-AとMPH16-Bはそれぞれ350~700 nmと650~1050 nmのARコーティング付きです。
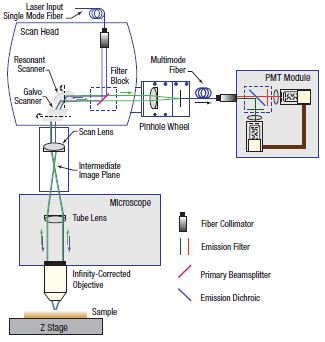
共焦点顕微鏡システムの概略図
共焦点顕微鏡内の電動ピンホールホイール
電動ピンホールホイールは、右の図のような共焦点顕微鏡への組み込み用として設計されています。ピンホールホイールはイメージング路の光電子増倍管(PMT)のすぐ手前に配置されています。試料から放出された光は選択されたピンホール上に結像した後、大きなコア径のマルチモードファイバで集光してPMTディテクタに送られます。 ピンホールホイールを用いると複数のピンホールから選択可能なので、用途に適したピンホールサイズを選ぶことができます。
リソグラフィーエッチングで作成されたホイール上のピンホールにより、顕微鏡の焦点面以外からの不要な信号はディテクタに到達できません。測定しようとする焦点面からの光のみがディテクタに到達するため、共焦点顕微鏡は厚みのある試料から高分解能光学切片画像を取得することができます。また、薄層培養試料のバックグラウンド蛍光ノイズを大幅に減少させることもできます。
電動ピンホールホイールは当社の共焦点顕微鏡用に設計されていますが、16 mmならびに30 mmケージシステムにも取り付けが可能です。下の写真は共焦点顕微鏡システムの一部で、ビーム路を変更するのに直角ミラーマウントKCB1C(/M)とミラーBB1-E02を使用しています。フィルターブロックの代わりに蛍光フィルターキューブDFM(/M)が取り付けられていますが、これによりダイクロイックフィルターセットが簡単に交換可能になります。ピンホールを通った光は、PMTディテクタの代わりに増幅フォトディテクタPDA10A2を用いて検出しています。

Click to Enlarge
共焦点イメージングシステムセットアップ内の電動ピンホールホイールMPH16-A
空間フィルタの原理
入射ガウシアンビームには、空間的に変動する強度「ノイズ」があります。ビームをレンズで集光した時、入射ビームは(光軸上の)中心のガウシアンスポットと、不要な「ノイズ」(図1参照)である周囲のフリンジに変換されます。フリンジの径方向の位置は「ノイズ」の空間周波数に比例します。
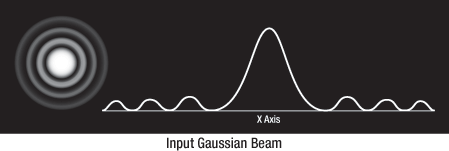
図1
ガウシアンスポットの中心にピンホールを配置することによって、ビームのクリーンな部分が透過し、「ノイズ」である周囲のフリンジは遮断されます(下図2参照)。
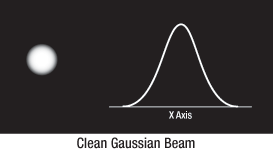
図2
回折限界スポットサイズをビームパワーの99%が透過する等高線で表した時、その径は次の式で与えられます。

ここで、λは波長、fは焦点距離、Dは直径、およびrは1/e2における入射ビームの半径です。
| Recommended Beam Parametersa | |
|---|---|
| Wavelength | Input Beam Radius (1/e2) |
| 405 nm | 1.5 mm |
| 488 nm | 1.8 mm |
| 532 nm | 1.9 mm |
| 632 nm | 2.3 mm |
空間フィルターシステムのための正しい光学素子とピンホールの選択
正しい光学素子とピンホールは、入射波長、光源のビーム径、およびご希望の出射ビーム径に基づいて選択します。
例として、入射ビーム径(1/e2)が2.3 mmで、波長が632 nmの半導体レーザ光源と電動ピンホールホイールを使用するとします。 ビームパワーの99%が透過する等高線で表された回折限界スポットサイズは上記のとおりです。この例では、λ = (632 nm)、f = 75 mm(MPH16で使用されているアクロマティック複レンズ)、r = 2.3 mmとなります。これらを上式に代入すると以下のようになります。

回折限界スポットサイズ(光源波長:632 nm、入射ビーム径:2.3 mm)
ピンホールとしてはDよりもおよそ30%大きいものを選択します。ピンホールが小さすぎるとビームクリッピングが生じ、大きすぎるとTEM00以外のモードがピンホールを通過してしまいます。そのため、この例では25 μmのピンホールが適しています。その他の波長で推奨されるビーム径については右の表をご参照ください。

MPH16ソフトウェアGUI
電動ピンホールホイール用ソフトウェア
電動ピンホールホイール用の最新ソフトウェアへのリンクです。ソフトウェアダウンロード
ページではDDL、GUIインターフェイス、SDKならびにLabVIEW™サンプルコードの
ダウンロードが可能です。
| Posted Comments: | |
义强 王
(posted 2023-07-19 09:44:08.25) 我想了解下这款针孔的调节事项 cdolbashian
(posted 2023-08-16 09:26:50.0) Thank you for reaching out to us here. A member of our local tech support team has reached out to you directly to address your inquiry! Max S
(posted 2021-07-26 15:12:28.91) The pinhole wheel does not seem like symmetrical. The reflectance is different if you compare both sides. Due to the quite limited mounting options on the side where the connectors are, I would like to use the pinhole wheel in flipped orientation. Does the pinhole wheel operates bidirectional just fine or might this cause some struggle due to the coating or so? YLohia
(posted 2021-07-30 02:54:44.0) Hello, the glass disk in each motorized AR-coated pinhole wheel is coated on both sides to increase transmission through the wheel for the specified wavelength range so it can be used bi-directionally. Craig Prater
(posted 2019-06-06 19:05:49.997) For use on an optical table, it would be far more convenient if this item had some 8-32 or 1/4-20 mounting holes (and their metric equivalents) on the bottom surface such that this unit could be mounted on pedestals or posts. I was really surprised to see that this unit had no options for mounting except dovetail or cage mount. It is really to heavy to support itself on cage mount rods. Because of the three covers, the bottom surface is also not flat so it will lead to an uncertain/unstable mounting if clamped on the top directly onto an optical table. YLohia
(posted 2019-06-07 09:25:37.0) Hello, thank you for your feedback. I have brought your suggestion up in our internal engineering forum for further consideration. shshin
(posted 2018-12-13 17:36:54.73) It seems that labview sdk for mph16 has no function to change the size of pinhole. Is there another sdk for this? nbayconich
(posted 2018-12-20 04:55:20.0) Thank you for contacting Thorlabs. When you open the Labview example ‘PinholePositionTest.vi’ you will get the test panel which shows a slider and position display for the Pinhole position. When first opening the slider will show a range from 0 to 100. Once you Run/Execute the example the slider will change from 0 to 15. The 0 to 15 are the Pinhole Positions as there are 16 pinholes in the MPH16. The sizes range from 25um to 2mm. For reference you can start the Standalone app Which comes with the SDK and check the UI for the specific sizes.
Neither the Labview Example nor Standalone app will connect to the device if the Com port setting (in device manager) does not match the Pinhole settings file. shshin
(posted 2018-06-19 02:01:02.503) About the 'Dovetail Adapter' included in 'MPH16'
I purchased your product, MPH16. I used 'Dovetail Adapter' to adapt 30mm cage system to Input port. But, there's no screw hole on it. It has hole but slightly biggher than 4/40(about 2.8mm). Also, It is not a hole for screw but just literally a 'hole'. How to adapt this thing to '30mm cage system'? YLohia
(posted 2018-06-19 12:04:44.0) Hello, you will have to use the 4-40 cap screws (included) to adapt to the back of the dovetail adapter. I will reach out to you directly with a screenshot. cbrideau
(posted 2016-01-11 20:49:43.46) Just got this, but need the manual so I know what commands to send it to move to a given pinhole size. Was very surprised to find that I couldn't just download the manual from the website like every other product. jlow
(posted 2016-01-12 08:51:56.0) Response from Jeremy at Thorlabs: We are currently revising the manual for this. We will be uploading the revised manual to the website within the next 2 weeks. 80kmh
(posted 2014-08-20 17:44:52.833) I want to use Labview to drive MPH.
I can not find labview file in the suppoort CD.
Tried several times, there is always error message or not working.
Could you please provide sample code or example code for labview?
I need your help I should. jlow
(posted 2014-08-20 02:37:03.0) Response from Jeremy at Thorlabs: We have a SDK for C++ that can possibly be adapted to LabVIEW. We will contact you directly about this. bryan.donaphon
(posted 2014-06-16 22:38:01.713) How susceptible is the MPH16 to magnets? I have a confocal microscope setup, and I was thinking of using magnets to secure glass coverslips to the objective stage. However, I want to make sure that these magnets will not interfere with the MPH16 in any way. besembeson
(posted 2014-06-26 11:26:50.0) Response from Bweh at Thorlabs: The MPH16 is optically encoded. Magnets on the coverslips are fairly far away from it. The magnetic field will have no effect on the MPH16 performance. arran.curran
(posted 2014-02-26 07:45:14.77) The indexing of the pinhole position (0-15) doesn't seem to correspond to pinhole size order (25 um, 30 um, ...). Can you list the indexing in order of pinhole size for those of us developing our own control software. This information doesn't seem to be included in the SDK. jlow
(posted 2014-02-27 05:01:14.0) Response from Jeremy at Thorlabs: We will contact you directly to provide this information. crowdifat
(posted 2013-11-20 09:35:09.12) I checked working status this item with software but there is some problem about position of pinhole.
Position of pinhole is not located center but upper position. All um size are same wrong position. Please let me know. jlow
(posted 2013-11-20 08:20:08.0) Response from Jeremy at Thorlabs: We will contact you directly to troubleshoot this. moonsik
(posted 2013-11-06 14:42:35.387) I want to use this product using Labview.
Could you give me a labview file or example file? tcohen
(posted 2013-11-07 03:42:18.0) Response from Tim at Thorlabs: Thank you for contacting us. We’ve emailed you to supply further documentation. icsong
(posted 2013-07-09 16:45:25.413) When the software with Labview will be available?
I tried to open the dll in Labview but some function is not working. please show me any information working with labview jlow
(posted 2013-07-19 08:48:00.0) Response from Jeremy at Thorlabs: We will get in contact with you directly about using the software in LabVIEW and a sample code. james.parker
(posted 2013-02-08 07:24:52.417) Is the focussing onto the pinhole (distance between lens and pinhole) adjustable? The text only describes radial positioning of the lens. Thank you. cdaly
(posted 2013-02-20 14:53:00.0) Response from Chris at Thorlabs: Thank you for your inquiry. The lens remains fixed but the set screw described in the text translates the internal pinhole assembly itself between the lens and fiber tip, along the optical axis. tcohen
(posted 2012-07-10 11:18:00.0) Response from Tim at Thorlabs: The lens used is our AC127-075-A (f=75mm). This product has had a recent modification and will have the ability to convert the SMA output to an SM05 output. There is also 16mm cage compatible mounting features which can be adapted to the 30mm cage with the SP05 cage adapter. We would like to discuss this product with you and we will contact you directly to continue this conversation. martin.vogel
(posted 2012-07-09 17:28:49.0) Hello, cool product indeed! May I ask two questions? 1) What is the effective focal length of the focusing lens in the MPH16? 2) Would it be possible to get the MPH16 with a free space *exit* port (no fiber connector) that is compatible to the 30mm cage system? Many thanks in advance! tcohen
(posted 2012-02-27 14:09:00.0) Response from Tim at Thorlabs: Here are some updates to your questions.
1. The pinhole wheel is a thin glass substrate coated with pinholes patterns. There is also a BB AR coating to reduce the reflection in 350 ~ 700 nm. The multimode fiber is place on the other side of the glass wheel. The fiber is place as close as possible to the wheel but usually leaving a 1 mm space. So the distance from the pinhole to the fiber end includes 0.5 mm in the glass and 1 mm in the air. The refractive index of the glass substrate is Ne=1.5255, Abbe number Ve=55.
2. Currently the SMA connector is the only mounting fixture for light collection. Special mounting holes are possible upon request.
3. There are DLLs to drive the pinhole wheel through a USB serial port. Software API with Labview demo will be available soon.
4. Azimuthal positioning is accomplished by an optically encoded motor which provides a resolution of 10 um along the circle.
5. Radial positioning is accomplished by adjusting the focusing lens with a set screw. tcohen
(posted 2012-02-24 10:10:00.0) Response from Tim at Thorlabs: Thank you for your feedback. Our design team has seen your questions and we will post an update with information soon. If you have any further questions in the meantime, we can assist you directly at techsupport@thorlabs.com. user
(posted 2012-02-24 09:26:00.0) Cool product, would like to use for non microscopy application. Here again, i also need to know how repeatable? And where is the pinhole located with respect to the external surfaces. user
(posted 2012-02-22 23:35:29.0) What is the distance the fiber would be from the pinhole or is there an imaging setup that launches the light from the pinhole into a fiber? Can this be ordered without the SMA connector so that the light passing through the pinhole can be used with a free space spectrometer? How does the software control which pinhole is being used is there a manual override or controller box option? Are there Labview drivers? Can the positioning of the pinhole be as accurate as what is accomplished with say the ST1XY-D? All that being said I really like this product as a concept and I hope it meets what we are looking for. |
| Apertures Selection Guide | |||
|---|---|---|---|
| Aperture Type | Representative Image (Click to Enlarge) | Description | Aperture Sizes Available from Stocka |
| Single Precision Pinholesa |  | Circular Pinholes in Stainless Steel Foils | Ø1 µm to Ø9 mm |
 | Circular Pinholes in Stainless Steel Foils, Vacuum Compatible | Ø5 µm to Ø2 mm | |
 | Circular Pinholes in Gold-Plated Copper Foils | Ø5 µm to Ø2 mm | |
 | Circular Pinholes in Tungsten Foils | Ø5 µm to Ø2 mm | |
 | Circular Pinholes in Molybdenum Foils | Ø5 µm to Ø2 mm | |
 | Square Pinholes in Stainless Steel Foils | 100 to 1000 µm Square | |
| Slitsa |  | Slits in Stainless Steel Foils | 3 mm Slit Lengths: 5 to 500 µm Widths 10 mm Slit Lengths: 20 to 500 µm Widths |
 | Double Slits in Stainless Steel Foils | 3 mm Slit Lengths with 40, 50, or 100 µm Widths, Spacing of 3X or 6X the Slit Width | |
| Half-Apertures |  | Mounted, Half-Aperture Foils | Half-Apertures for Knife-Edge Scan Measurements |
| Annular Apertures |  | Annular Aperture Obstruction Targets on Quartz Substrates with Chrome Masks | Ø1 mm Apertures with ε Ratiosb from 0.05 to 0.85 Ø2 mm Aperture with ε Ratiob of 0.85 |
| Pinhole Wheels |  | Manual, Mounted, Chrome-Plated Fused Silica Disks with Lithographically Etched Pinholes | Each Disk has 16 Pinholes from Ø25 µm to Ø2 mm and Four Annular Apertures (Ø100 µm Hole, 50 µm Obstruction) |
 | Motorized Pinhole Wheels with Chrome-Plated Glass Disks with Lithographically Etched Pinholes | Each Disk has 16 Pinholes from Ø25 µm to Ø2 mm and Four Annular Apertures (Ø100 µm Hole, 50 µm Obstruction) | |
| Pinhole Kits |  | Stainless Steel Precision Pinhole Kits | Kits of Ten Circular Pinholes in Stainless Steel Foils Covering Ø5 µm to Ø9 mm |
 Products Home



 電動ピンホールホイール