位置センシングディテクタ(PSD)
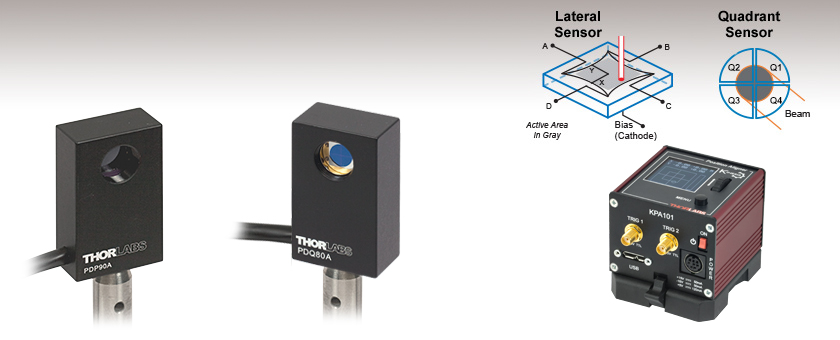
- Quadrant and Lateral Effect Sensors
- Compact Footprint
- Compatible with SM05 Lens Tubes
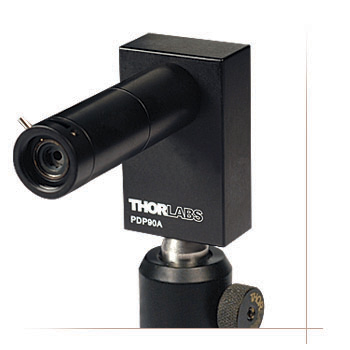
PDP90A
2D Lateral
Effect PSD
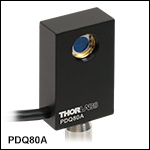
PDQ80A
Segmented
Quadrant PSD
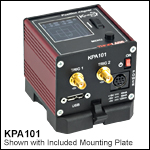
KPA101
K-Cube Controller
Sensor and Controller Sold Separately

Please Wait

| Item # | PDP90A |
|---|---|
| Material | Si |
| Wavelength Range | 320 to 1100 nm |
| Resolution, @ 635 nm | < 0.75 µm @ 100 µW, < 7.5 µm @ 10 µW |
| Recommended Spot Size | Ø0.2 - 7 mm |
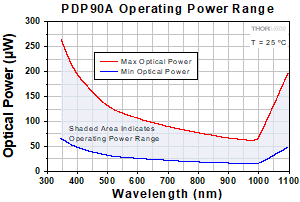 Click to Enlarge
上図の網掛け部分が最小と最大の入力パワーレベルの幅を波長毎に示しています。分解能とノイズの数値が最適値となるよう、入射光のパワーが最大値に近い状態であることをご確認ください。最大値を超えると、センサは飽和状態になりエラーが発生します。
特長
- ラテラル効果位置センシングディテクタ(PSD)
- ビーム形状やパワー密度には無依存
- SM05レンズチューブが使用可能
- コンパクトな設置面積
位置センサPDP90Aはシリコンフォトダイオードベースのピンクッション型のテトララテラルセンサを利用して、校正中心に対する入射ビームの変位を正確に測定します。これらのデバイスは、ビームの動きや移動距離の測定やアライメントシステムへのフィードバックに適しています。
検知面積が広く、最大9 mmのビーム径に対応できますが、当社では0.2~7 mmまでの範囲での使用を推奨しています。4分割された検出面の全てに光を当てる必要のある4分割PDセンサと異なり、ラテラルセンサは、ビーム形状、ビーム寸法やパワー分布に関係なく、検出領域内であればどのスポットの位置情報でも提供できます。PDP90Aのノイズ数値は<2 mVpp (<300 µVrms)と非常に低くなっており、検出誤差は0.750 μmrmsとなっています。分解能は下記の式で得られるように、入力光パワーと直接的に関連します。

ここでは、
ΔR が分解能、
Lx が抵抗の長さで10 mm、
en が出力騒音電圧で300 µVrms未満、
Vo が出力電圧レベルの合計で最大4 V
従って、最大パワーレベルでは分解能が0.75 µmとなります。さらに詳しい技術情報に関しては「技術情報」タブをご参照ください。
ラテラル位置検出ディテクタPDP90Aには、#8-32 - M4 アダプタが付属しており、ミリ規格とインチ規格の両方のポストに対応できるようになっています。
コントローラ
PDP90Aは、別売りのコントローラKPA101(下記参照)と共にご使用いただけます。K-Cube™ビーム位置アライナKPA101は、当社のKinesis®シリーズのコンパクトな高性能モーションコントローラです。当社の4分割位置センサならびにラテラル効果位置センサーヘッド製品に接続して、センサ上のビーム位置を測定したり(開ループモード)、自動ビームステアリング素子への入力信号を生成したり(閉ループモード)するためにお使いいただけます。この製品は、K-Cubeピエゾコントローラ&ひずみゲージリーダKPC101と組み合わせて閉ループビームステアリングを行うのに適しています。詳細はこちらの製品紹介ページをご参照ください。
| Item # | PDP90A |
|---|---|
| Electrical Specification | |
| Wavelength Range | 320 to 1100 nm |
| Peak Responsivity | 0.6 A/W @ 960 nm |
| Resolutiona | 0.75 µm |
| Voltage Noiseb | < 2 mVpp, < 300 µVrms |
| Position Displacement Errorc | ±250 µm |
| Transimpedance Gain | 100 kV/A |
| Photocurrent | 40 µA (Max) |
| Output Voltage Range | Pins 1 and 2: -4 V to 4 V Pin 3: 0 to 4 V |
| Signal Output Offset | 0.3 mVtyp (7 mVmax) |
| Bandwidth | 15 kHz |
| Recommended Spot Sized | Ø0.2 mm to Ø7 mm |
| Maximum Spot Sizee | Ø9 mm |
| Supply Voltage Requirement | ±5VDC ±5%, 35 mA |
| Operating Temperature | 10 to 40 °C |
| Storage Temperature | -20 to 80 °C |
| Physical Specifications | |
| Sensor Size (Active Area) | 9 mm x 9 mm (0.35" x 0.35") |
| Clear Aperture | Ø0.50" (Ø12.7 mm) |
| Sensor Depth | 3.05 mm (0.12") |
| Aperture Thread | Internal SM05 (0.535"-40) |
| Dimensions | 2.00" x 1.20" x 0.65" (50.8 mm x 30.5 mm x 16.5 mm) |
| Mounting Thread | 8-32, 0.25" Min Thread Depth |
| Metric Adapter | External 8-32 to Internal M4 Adapter (Item # AS4M8E) |
| Cable Length (Typical) | 5' (1.5 m) |
| Connector (Plug) | Hirose HR10A-7P-6P |
| Mating Receptacle | Hirose HR10A-7R-6S |
| Weight | 0.25 lbs (114 g) |
2次元ラテラル効果位置センシングディテクタ(PSD)
概要
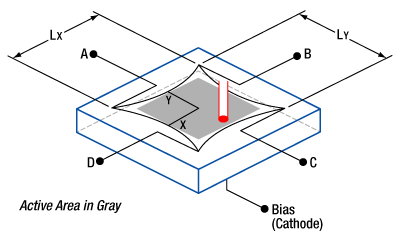
2次元ラテラル効果センサでは、移動量(運動、距離、もしくは角度等)を正確に測定するだけではなく、ミラー制御、顕微鏡の焦点調整やファイバ入射のシステムに対して、アライメントのためのフィードバックを送ることもできます。このセンサは、抵抗素子を使って光電流を部分的に配分して位置を特定するので、ラテラル効果センサと通常呼ばれています。ラテラル効果ディテクタには、デュオラテラル型とテトララテラル型と2つの種類があります。
デュオラテラルセンサには、アノードとカソードの両方の接続部分に抵抗体の層があります。これにより、センサのX方向とY方向の位置情報が独立して検出できるので、センサは高度に線形で非常に正確に位置を検知します。しかしながら、抵抗体の層を追加することで製造コストは高くなります。
テトララテラルセンサでは、カソードとアノードに共通の抵抗体の層が、検知エリアの両サイドそれぞれにあります。このような構成であるので、製造コストは低く抑えることができますが、スポットが中心から離れるにつれ、線形性は低くなります。これは物理的位置に起因した現象で、センサ端、とりわけ、アノード同士が近接する隅において起こります。当社では「ピンクッション」センサと呼ばれているテトララテラルセンサを使用しています。このセンサはで、アノードをセンサの四隅に移動させることで、検知エリアを再形成し、デュオラテラルセンサと同等の線形性を大幅に低いコストで実現しています。
位置の計算
PDP90Aには、下記のようにΔx、Δyと SUM 信号をデコードする回路が含まれています。

これらの公式を用いれば、下記の数式で実際の距離を計算することができます。

ここで、xとyはセンサの中心からの距離、LxとLyはセンサの受光面の抵抗の長さです。センサPDP90AではLx=Ly=10 mmです。なお、抵抗の長さは、検出部とは異なります。検出部は上図内でグレーに色づけされて示されています。
位置誤差
ラテラル効果センサは、4分割フォトダイオードとは異なり、ビーム形状や大きさに依存しません。ラテラル効果センサでは、光がセンサ上にある間はスポット重心の位置情報を提供します。しかし、光の一部がセンサからはずれてしまうと、重心がシフトし、ビーム測定の信頼性が失われます。
周囲の光の状態が位置の誤検知を引き起こす場合があります。適切な結果を得るには、PDP90Aを暗い場所で動作してください。しかしながら、レンズチューブを使って光を防いだり、アイリスを用いて視野を狭くしたりすれば、周囲の光によるエラーは減らせます。
位置分解能
PSDに入射する光スポットの変位が感知できる最小単位を表わすのが位置分解能です。位置分解能(ΔR)は、抵抗の長さ(Lx またはLy )、またはxとy の長さ、そして信号対雑音比(S/N)の2つの数値により決まります。このシステムの信号対雑音比は、トータル出力信号レベル(Vo )を出力電圧雑音(en )で割った数値です。PDP90A出力雑音は<2 mVpp もしくは<300 µVrms です。

ここでは、
ΔRが分解能、
Lx が抵抗の長さ、
en が出力雑音電圧、そして
Vo が出力の合計電圧レベルです。
PDP90Aに関しては下記の数式となります。

最適解は、Vo を4 Vにまで最大化して位置分解能が0.750 µm になることで求められます。この条件を実現するには、センサの出力の合計電圧をモニタして、出力が約4 Vになるように光強度を調整します。4 Vを超えてしまうと、システムが飽和状態になって測定値の信頼性が低下します。付属するソフトウェアでは、電圧レベルがスライドバーで表わされます。合計電圧が飽和状態にある時、スライドバーは赤になります。その場合は、スライドバーの色が緑に変わるまで強度を弱めてください。これで合計電圧の出力値は4 V になります。
フォトダイオードの詳細
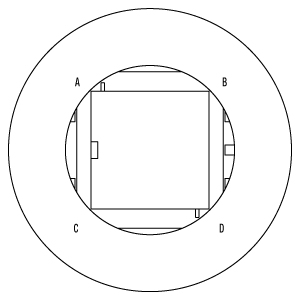
ディテクタの出力 - HIROSE
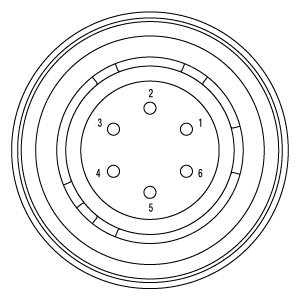
| Pin | Description |
|---|---|
| 1 | X-axis [A + D] - [B + C] |
| 2 | Y-axis [A + B] - [C + D] |
| 3 | SUM [A + B + C + D] |
| 4 | +Vsupply (+5 V) |
| 5 | Common |
| 6 | -Vsupply (-5 V) |
Click to Enlarge
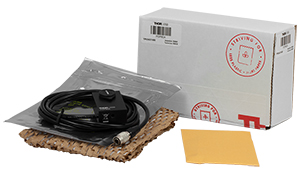
PDP90A Packaging

| Item # | % Weight Reduction |
CO2-Equivalent Reductiona |
|---|---|---|
| PDP90A | 34.45% | 13.66 kg |
| PDQ80A | 34.45% | 9.87 kg |
Smart Pack
- Reduce Weight of Packaging Materials
- Increase Usage of Recyclable Packing Materials
- Improve Packing Integrity
- Decrease Shipping Costs
Thorlabs' Smart Pack Initiative is aimed at waste minimization while still maintaining adequate protection for our products. By eliminating any unnecessary packaging, implementing packaging design changes, and utilizing eco-friendly packaging materials for our customers when possible, this initiative seeks to improve the environmental impact of our product packaging. Products listed above are now shipped in re-engineered packaging that minimizes the weight and the use of non-recyclable materials.b As we move through our product line, we will indicate re-engineered packages with our Smart Pack logo.
| Posted Comments: | |
changsheng li
(posted 2024-07-12 09:44:16.713) 咨询PDP90A产品符合性认证(产品合格证)证明和精度计量(质检报告)证明 cdolbashian
(posted 2024-06-04 01:59:15.0) Thank you for reaching out to us with this inquiry. For many of our photodiode detectors, we do not spec damage threshold, as they will saturate electrically far before they will be damaged optically. In this case the saturation power is a few mW (dependent on your wavelength), compared with 200mW you are using. Such information can be found in the spec sheet. I would not recommend using such a powerful optical source with this particular device. I have contacted you directly to inquire regarding your application and the necessity for such a high power source. user
(posted 2024-05-29 15:34:37.9) Dear Sir/Madam,
I purchased this item along with the KPA101 and I would like to know if it is possible to measure simultaneously the position of the laser beam and its optical power ? I assume this is feasible since the KPA101 provides the side bar to avoid saturating the amplifier. So could you please let me know what data I should use to access the measured power incident on the detector ?
Thank you very much in advance,
Flavien Beffara ksosnowski
(posted 2024-05-30 12:11:48.0) Hello, thanks for reaching out to Thorlabs. PDP90A has . The PDP90A's SUM voltage is a result of the total incident power on the sensor's active area and can be used as to estimate the total power in Watts using the specified transimpedance gain of 100 kV/A and peak responsivity of 0.6 A/W @ 960 nm. For other wavelengths, you can reference the typical spectral responsivity curve of PDP90A to account for the lower photocurrent response. We recommend keeping the SUM output at 4V to avoid saturation of the photodiode and amplifier in PDP90A, which could effect the measurements. Christian Knoechel
(posted 2022-10-12 13:49:18.937) Is there a way to change the gain of the sensor or to adjust something similiar to exposure time of a camera? ksosnowski
(posted 2022-10-20 09:50:05.0) Hello Christian, thanks for reaching out to Thorlabs. The PDP90A and our other position detectors are fixed gain units. You can use the SUM voltage to monitor the total power level, and Neutral Density filters as needed to attenuate the beam below saturation. We recommend operation below 4V SUM to avoid saturating the amplifier, and you can estimate the Sum voltage from your source using your input optical power with the PDP90A responsivity and gain. The PDP90A manual has more detail on this calculation on pages 4 and 5. Cole Perkins
(posted 2022-05-27 15:25:24.13) Hi, I am looking to purchase a PDP90A. I was curious if you had any recommendations for connecting the cable to a computer to read the output voltages. Also, once connected would the software provided display these outputs? Thank you. ksosnowski
(posted 2022-06-20 09:37:15.0) Thanks for reaching out to Thorlabs. I recommend the KPA101 PSD Auto-Aligner for connecting with the PDP90A, this will connect to the PC via USB and allow you to interface with our Kinesis Software to read the voltages from each pinout on the connector. You can also interface with various languages like LabView depending on what your application may require. It is also possible to run the PDP90A+KPA101 Headless, with no PC, using the display on the KCube to monitor the detector output. Some customers also choose to interface using a DAQ card to read the outputs. Minchul Kim
(posted 2022-04-28 10:42:11.58) Hello, I'm looking for 2D lateral effect PSD (NOT Quadrant PSD) for IR(1300~1600nm) wavelength range. Is it possible to order a custom-made product for such wavelength range? If it is possible, it would be grateful if you can send us a quote with estimated specs. cdolbashian
(posted 2022-05-02 01:40:06.0) Thank you for reaching out to us with this inquiry! Unfortunately, as you have pointed out, we do not have a device with this wavelength range. Implementing different electronic components into our current position sensor design would require substantial R&D to ensure high-quality performance. Due to this fact, we unfortunately cannot create a unique IR Lateral effect PSD for you at this time. Leon Lu
(posted 2021-07-11 02:29:35.28) Hi,
I'm wondering is the SUM output pin is a good measurement of the overall power on the entire sensor - in other words, if I can use the SUM signal as a normal photodiode like with the quadrant photodiode.
Thanks,
Leon cdolbashian
(posted 2021-08-19 04:31:23.0) Thank you for contacting us here at Thorlabs! Rather than the position formulas, you can indeed use the "SUM" as a traditional single photodiode measurement. I have emailed you directly to discuss this further! Tom Dzelzainis
(posted 2021-03-18 17:13:18.287) Hi,
Do you sell a power supply suitable for powering the PDP90A itself, i.e. a suitable +/- 5 V supply?
Many thanks,,
Tom. YLohia
(posted 2021-04-08 11:09:06.0) Hello Tom, we offer the KPA101 below, which is capable of powering up the PDP90A. Unfortunately, we don't sell a dedicated +/-5 V power supply for this at the moment. Thomas Dzelzainis
(posted 2021-02-02 13:49:45.78) Hi,
When I search for the compatible connector for the PDP90A, which is given in the manual as HR10A-7R-6S I find only panel mounting connectors. Would you be able to specify a compatible cable mounted connector?
Many thanks,
Tom. asundararaj
(posted 2021-02-08 11:15:34.0) Thank you for contacting Thorlabs. The HR10A-7R-6S panel mounted connector can also be used in a cable mounted configuration as used in our TLK-10. Hirose offers the HR10A-7P-6S that can also be used for a cable mounted application. That being said, we would recommend confirming with Hirose on its compatibility for your application. kiwook baeck
(posted 2020-12-14 20:24:19.927) Hi, I want to use PDQ or PDP on linux board(RPi or LttPd). Do you have any recommendation? asundararaj
(posted 2020-12-24 10:17:58.0) Thank you for contacting Thorlabs. The position sensing detectors were designed to be used with the KPA101. We do not have any recommendations on using this with a linux board. Wolfgang Bacsa
(posted 2020-09-17 11:44:03.703) Hi, The x and y displacement works well but for optimizing the laser beam (PDP90A), the information of the intensity measurement would be very useful. There is a display of the total light intensity falling on the detector on the K-cube controller. Is there any way to access this information? asundararaj
(posted 2020-09-17 04:33:52.0) Thank you for contacting Thorlabs. The total intensity is defined as the SUM and is used to estimate the position of the beam on the sensor. This can be accessed through the SMA port marked SUM on the KPA101. This can also be accessed on the provided operational software as the voltage level on a slide bar. If the SUM is saturated the slide bar color will turn red. M Sz
(posted 2020-07-31 10:07:17.823) to Charles:user from the previous post. I have made some requests to Thorlabs technical support,got some answers email but non of them regarding this issue. How can I get your dlls and ActiveX components? DJayasuriya
(posted 2020-08-03 09:39:12.0) Thank you for getting in touch. My colleague will get in touch with you directly to resolve your issue. user
(posted 2020-07-23 16:28:52.513) Hi,
I am going to use PDP90A with KPA101 ( but without KPZ Piezo Drivers) to calibrate the piezo fiber scanner ( I think I just need to monitor the fiber tip movement without using any loop). Data that I need to obtain from calibration are:
-sensor signal vs time for X, Y, and sum
-position X vs position Y
- fiber displacement vs frequency.
Can your APT/Kinesis software be able to produce data like that or if not how can I generate such results?
Thank you,
Regards,
M. cwright
(posted 2020-07-29 05:36:59.0) Response from Charles at Thorlabs: thank you for contacting us. This is not a feature which is provided in APT or Kinesis directly but the functionality is offered by our dlls and ActiveX components. Your local support team has reached out to you about how this can be achieved using the libraries provided with our software. user
(posted 2020-03-06 09:28:21.017) Hi, I am considering using your PDP90A sensor in an application where the optical power incident upon the sensor is limited. The exact value is not known yet, but it may be in the region of 1 µW to 10 µW at a wavelength of 900 nm, which is less than the recommended value indicated by the blue curve on the graph titled "PDP90A Wavelength Dependence on Optical Power With Operating Power Range". What would be the consequences of operating below the recommended power level? Would there simply be increased uncertainty on the measured position, or are there other consequences? YLohia
(posted 2020-03-19 12:34:42.0) Hello, thank you for contacting Thorlabs. This graph was generated based on the operating parameters. The "Max Optical Power" curve was based on the max output voltage capability, the photodiode amplifier gain, and the responsivity of the sensor. This is essentially the saturation point of the PDP90A for a given wavelength. The "Min Optical Power" curve was generated for a 16-bit input DAC that was originally sold with these a while ago. The curve was based on the number of counts needed to maintain a 1% error. Going below that curve would lower the accuracy of the measurement. Depending on what you are measuring the signal from the PDP90A with, the sensor output voltage may be too low to accurately measure the position. This is more of a function of the available gain in the PDA90A. You may be able to amplify the output before measuring to correct for this. user
(posted 2020-01-27 21:47:17.69) What laser modules are recommended for use with PDP90A? Can the output power for LDM635 be adjusted low enough to avoid exceeding the 40 uA max allowable photocurrent? asundararaj
(posted 2020-01-28 01:50:49.0) Thank you for contacting Thorlabs. The LDM635 has a 4 mW power specification at 635 nm. The responsivity of the sensor in the PDP90A is approximately 0.4 A/W at 635 nm, so an incident beam of 100 µW would saturate the sensor.
Reducing the output power to 2% would keep you safely within the recommended region suggested on the overview page for this product at 80 µW. The LDM635 can be adjusted via a recessed screw on the laser but you need to use a power meter to determine the power as it is adjusted. Alternatively you can use ND filters with an OD of at least 1.7 to achieve this. Vignesh Kannan
(posted 2020-01-16 12:21:49.857) We seem to have an issue with the PDP90A. I noticed that the sensitivity in output signal for the X-channel i.e. pin 1 was significantly smaller than for pin2 (Y-channel). The \SUM channel was set at ~ 4V. In addition, when the incident laser beam was turned off, the X-channel had a value of -1 V and not 0 as expected. Could someone help me troubleshoot this problem please? asundararaj
(posted 2020-01-17 09:25:41.0) Thank you for contacting Thorlabs. We will reach out to you directly via email. Jr-Rung Chen
(posted 2020-01-07 19:29:32.057) We have the PDQ80A and KPA101. We try to use the postion signals which is from Sum, X Diff and Y Diff in KPA101. We found that the SUM has voltage from 0-10 V but others are always zero. Are thry need to set ? asundararaj
(posted 2020-01-08 11:19:00.0) Thank you for contacting Thorlabs. The signal on the X DIFF and Y DIFF terminals depend on the operating mode selected. This is elaborated in Section 4.5 of the Manual. The SUM signal from the detector is always present on the rear panel SUM SMA connector irrespective of the operating mode selected. The SUM is proportional to the total amount of light hitting the detector. In the open loop mode, the X DIFF and the Y DIFF outputs are set to zero, or are held at their last closed loop voltage (depending on the setting of the 'Position Demand In Open Loop Mode' parameter in the Settings panel).To be able to monitor the signal, please select Monitor Mode. Aleksei Polukhin
(posted 2019-12-19 02:47:35.327) Hello. Early you mentioned that for PDP90A maximum output current is 40 μA and for a 532 nm beam maximum optical power is about 0.1 mW.
But in the detector's User Guide (Rev J, August 20, 2019) mentioned that max photocurrent is 500 μA (p. 5). Using photosensitivity curve I got for 532 nm beam next calculation of max optical power:
P_max = 500 μA / [0.33 A/W] = 1515 μW = 1.515 mW.
Is it right calculation? asundararaj
(posted 2019-12-20 11:10:38.0) Thank you for contacting Thorlabs. The saturation current for the PDP90A should be closer to 40 µA instead of 500 µA. The max output voltage is 4V with gain of 100kV/A. So to avoid saturation of the amplifier, the photocurrent needs to be lower than 40 µA. We are currently working to update the Specs tab as well as the Manual. Rui Zhang
(posted 2019-12-16 04:03:44.237) I would like to ask if this position sensor is available to pulsed laser too?
For example 1~50 Hz YLohia
(posted 2019-12-16 01:22:11.0) Thank you for contacting Thorlabs. The PDP90A is specified for a 15 kHz bandwidth. It can detect 1-50 Hz pulses. Jan Vlacil
(posted 2019-09-16 05:22:26.49) Hello, we are currently using the PDP90A Sensors in our custom measurement system. Is there any need to recalibrate the system after some period of time? For how long can the sensors maintain its accuracy? Thank you for your help. asundararaj
(posted 2019-10-22 04:32:31.0) Thank you for contacting Thorlabs. We do not offer recalibration services for the PDP90A as they are intended for relative position measurement and not absolute measurements. The sensor and position accuracy are tied to temperature so there can be a drift naturally just from environmental changes. I have contacted you directly to discuss this further. Vignesh Kannan
(posted 2019-08-14 10:05:47.407) Hello. We are interested in using the PDP90A without the K-cube using a custom measurement system.
Is there a special cable that I can use to connect the Hirose connector to coaxial inputs or would I have to re-wire the cables myself?
Also, if I would like to perform a manual calibration of the zero-position of the sensor, can I simply use my laser's kinematic mounts to get the x and y signals to zero?
Thank you. YLohia
(posted 2019-08-16 09:03:56.0) Hello, thank you for contacting Thorlabs. Unfortunately, we don't have a special cable for third party read-out systems, so you would have to wire the connections yourself. Assuming you are asking whether you can use your kinematic mount to move the laser spot to the true "zero" position of the PDP90A, the answer is yes. Woojin Choi
(posted 2019-06-04 06:45:37.763) In your comment below, you referred that the bandwidth meant the sampling rate of the detector. I heard that KPA101 is needed to get the position data from PDP90A. I am wondering the maximum number of the position data per second when I use KPA101 and PDP90A. rmiron
(posted 2019-06-05 11:17:24.0) Response from Radu at Thorlabs: The specification you are looking for is the sampling rate of KPA101s analogue to digital converter, which is 20 kHz. Woojin Choi
(posted 2019-03-29 01:06:17.09) I am considering to buy PDP90A. I have a question about the specification of PDP90A. What is the meaning of bandwidth in the specification? Does this mean the sampling rate per second? YLohia
(posted 2019-03-29 09:32:08.0) Hello, yes, you are correct. The "bandwidth" in this case refers to the sampling rate of the detector. tuomo.nupponen
(posted 2019-02-13 16:45:53.04) Hi,
Looking for very precise xy-position sensor to be used with my Polytec PL650 W HeNe laser connected to Leica T3000 0,5" high precision alignment theodolite.
Laser Unit: Polytec PL-650 W
-Wavelength: 632,8 nm
-Output Power: 3 mW
-Effective Output Power from telescope: 0,1 mW
-Polarization: Random
-Amplitude Stability: +/- 2% (short term)
-Beam diameter with theodolite optics:
at 10 m 0,5 mm
at 50 m 2,5 mm
at 100 m 5 mm
at 200 m 10 mm
at 300 m 15 mm
What would be your recommendation: Can Lateral Effect Position Sensor be successfully used, or are Quadrant Position Detectors better choice? YLohia
(posted 2019-04-05 11:36:53.0) Hello, thank you for contacting Thorlabs. Is your beam circular and Gaussian? At what specific distance are you hoping to measure the beam position? We would also need to know the diameter of the beam at the point where you plan on placing the position sensor. I had reached out to you directly at the time of this posting to gather these details. al12179
(posted 2019-02-01 16:48:12.26) I need to use a Silicon quadrant detector, and you recommend a spot size above 1 mm, but I need to put this detector in the focal plane of my telescope. How can I get such a big spot size in the focal plane? According to my current asumption, the focal plane will have a spot diagram around 20 um. Thank you! llamb
(posted 2019-04-05 02:43:07.0) Thank you for your feedback. The silicon quadrant detector will have errors introduced if you reduce the spot size below Ø1 mm in diameter. To work around this, you could consider using a beamsplitter prior to your focal plane to monitor the position of this split-off beam with a larger spot size at a different location. This way could still allow you to track small movements of your beam. I reached out to you by email on February 4th to discuss more details about your application. steve
(posted 2018-12-05 15:03:06.257) Is data available for XDIFF output voltage vs. beam position on the the PDP90A position sensor so its linearity can be examined? The manual cautions to stay within the inner 80% area for best results. Is that due to linearity concerns or noise? I have noticed large increase in XDIFF and SUM output voltage noise when a beam gets closer to the sensor edge. How linear then is it within the 80% region? Suggest using a laser pointer perhaps with iris and mechanical translation stage to step across the sensor (10 micron increments ?) and record XDIFF output voltage. Do this across the horizontal center YDIFF=0 line. Suggest mentioning in the manual that noise increases near the sensor edge. YLohia
(posted 2018-12-24 09:59:09.0) Hello, thank you for contacting Thorlabs. It appears that you are already in contact with us via email -- we will continue to troubleshoot this issue there. Please note that the linearity data is not available. That being said, we can provide 10 lot sampling data for reference. volker
(posted 2018-11-12 01:13:44.85) We use the lateral sensor together with KPA101 with
a pulsed laser with a repetition rate of 10kHz. When using the APT software the SUM signal fluctuates wildy from close to 0 up to oversaturated. I believe this is due to some sampling issue (e.g the software sampling rate not being in sync with the repetition rate of the laser. Is there a way to trigger the acquisition or to reduce the bandwidth of the detector, e.g low-pass filtering?
The outputs of the KPA101 (diffx, diffy and sum) look to be a series of pulses with long tails, but the APT software may sample the pulses at varying time positions, causing the issue. Is there a way to use/modify the APT software or some labview library to allow measurements of pulsed lasers more smoothly. The detector seems to work easily with cw laser. rmiron
(posted 2018-11-12 11:25:28.0) Response from Radu at Thorlabs: In theory, one can synchronise the detector's sampling to the laser's pulses by using the trigger port and sending signals accordingly. However, it would be much easier to attempt amending the problem by adjusting the low-pass filter. You can tune its frequency from Kinesis, if you access the device's settings. You can also set the operating mode of the trigger port from the same location. Unfortunately, you cannot adjust those settings without connecting KPA101 to a PC. robertmeissner
(posted 2018-10-16 06:50:24.703) Is there a way to extract the voltage of all four quadrants separately? Your cubes and connectors only provide the X and Y signals, not the respective voltages. rmiron
(posted 2018-10-19 10:21:49.0) Response from Radu at Thorlabs: Hello, Robert. Unfortunately, this is not possible. As you can see in the pin diagram tab, the detector only outputs the XDIFF, YDIFF & SUM readings. Furthermore, you cannot derive the readings for each quadrant from these values, because if you attempt to do so, you would have 3 independent equations and 4 unknowns. Therefore, a change of hardware would be required in order to enable users to obtain those values. If you write to us here, or at europe@thorlabs.com and describe some of the benefits that such a feature would bring, we will relay your feedback to the relevant engineers. 1208084305
(posted 2018-10-09 10:57:22.937) We have bought your company's PDP90A, and then we would like to use it to measure the moving distance of the spot, but will not operate, I would like to ask the specific how to set up the experiment and then how to operate it, can you give a specific explanation? YLohia
(posted 2018-10-10 10:05:24.0) Hello, thank you for contacting Thorlabs. Based on our discussion, the TPA101 that you are using with your PDP90A is actually working fine and outputting the offset voltages. These voltages can be converted to actual positions (in mm) by utilizing the equations given under the "Tech Info" tab of this page. You can then use one of our supported programming languages such as LabVIEW to keep track of the absolute position in the x and y coordinates to obtain the distance traveled from Point A to Point B within a particular time interval. Specific operating instructions can be found in the manual for the TPA101. Franckyboy.morin
(posted 2018-08-27 17:02:01.483) I would like to use this laser position sensor in an industrial application for machine flatness adjustment. The laser I intend to use Is a construction work leveling laser. See Leica rugby 840. It offers the rotary laser configuration as well as the straight beam configuration. The laser shoots in the 635nm wavelength and has an output power of 2.7 mW. The beam divergence is less than 1.5 mrad. I plan to use the sensor indoor with the lights on.
Along with the sensor, I plan to buy a tube to fit the aperture, 3" long, with a laser line filter for 635nm. This is to reduce noise caused by ambiant light.
I calculated the maximum optical power permissible for this wavelength to be 0.1 mW. Is this correct? Will I break the sensor if I go beyond that? To reduce the input power, I plan to use one of your ND absorption filters with AR coating. I plan to fit it behind the laser line filter.
Since it is my first time with that kind of technology, I would like to know if you have food for thoughts to send my way? Anything I forgot or did not consider right? llamb
(posted 2018-09-14 02:33:54.0) Thank you for contacting Thorlabs. You are correct that the maximum optical power at 635 nm is about 0.1 mW. Going much higher would begin to saturate the sensor. The sensor will saturate at a much lower power density than its damage threshold, so if saturation is noticed and the maximum optical power is exceeded, make sure to refrain from increasing the power any further to avoid risk of damage. ND filters are indeed useful if your beam power is normally 2.7 mW. creative.query123
(posted 2018-06-13 04:12:53.377) Hi,
I wonder how can we divide the x and y voltage output of sensor by sum output voltage of sensor, as all of sensor outputs will have some noise in it and dividing the two output also divides the noise (x and sum) in it and resultant can be more noisy. Even after filtering, some residual noise may remain, so how can we divide such two quantity and get precise angle? YLohia
(posted 2018-06-14 04:49:14.0) Hello, you are correct about all channels having some noise. That being said, the noise comes from the same detector/amplifier so it will actually get smaller (since the noise is the same across channels). Another thing to note is that the detector itself is photovoltaic, which means less inherent noise. We also have a spec for voltage noise, which is <2 mVpp or <300 µVrms for the 15kHz bandwidth of the detector. Unfortunately, we don't have any suggestions for reducing the little noise that remains. user
(posted 2018-05-16 15:16:51.847) Hi, I'm using the PDP90A and would need to know the relationship between the DIFF output voltage and the absolute value of the beam position. Using your formula I get that 1mV corresponds to 1.25um when operating close to saturation, i.e. SUM ~ 4V, is this correct? Many thanks in advance! bhallewell
(posted 2018-05-22 06:37:04.0) Response from Ben at Thorlabs: You can find the calculations within the 'Calculating Position' section of the 'Tech Info' tab. This is correct - to within the calculated Position Resolution error value. h.wu
(posted 2018-04-30 09:21:52.04) I would like to know which PDAs can provide the absolute value of beam displacement? PDP90A or PDQ80A? Thanks. YLohia
(posted 2018-04-30 09:22:04.0) Hello, thank you for contacting Thorlabs. Both the PDP90A and PDQ80A can provide this information. The PDQ80A, however, is only useful when the beam displacement is less than the radius of the beam and requires the beam to have some component present in all four quadrants. Thus, it seems that PDP90A may be better for your application. a.randall
(posted 2018-04-18 08:11:56.243) Found this when looking for something to help with alignment of my microscope- realized a version that had a matched SM thread on the back (aligned to the one on the front would be very useful so the device to could be attached to the input of a downstream device YLohia
(posted 2018-04-18 09:31:12.0) Hello, thank you for your feedback. We would be a little wary of adding a matched SM thread on the back since that would only negatively impact the tolerance stack of a system that is required to have very precise alignment. I will contact you directly to find out about your application and brainstorm other ideas to mount your position sensing detector to your setup. amar230292
(posted 2018-04-11 23:04:34.963) What is the output impedance of sum,x and y pins of PDP90A? I want to read these value through ADC.
Thanks in advance. YLohia
(posted 2018-05-02 09:09:26.0) Hello, thank you for contacting Thorlabs. The output is driven directly by a Texas Instruments TL074BCD op-amp in the circuit. Op-amp output impedance is typically very low (ideally zero). Unfortunately, this component does not have an output impedance spec from the manufacturer. craig
(posted 2018-02-12 14:40:48.453) Hi. I just received a PDP90A lateral effect detector. I wanted to offer some feedback that I would have preferred that you sold it more ready to use out of the box. Specifically, I'd have preferred if I could have bought it with a power supply and it had two outputs X axis and Y axis. Second best would be if you included or at least sold the mating connector. What I didn't like is opening up the box and seeing I need to order a mating connector from Hirose or cut off the connector that was included. Thanks for listening! YLohia
(posted 2018-04-03 03:34:58.0) Hello, thank you for your feedback. We currently offer the KPA101 K-Cube Position Sensing Detector Auto Aligner for the PDP90A, which decodes the X and Y position signals and offers powerful auto-alignment features. The Hirose cable can directly plug into this without the need for any cable cutting. We currently have the ability to offer a female Hirose to male lead wires cable as a special, which sounds like the item you need. I will reach out to you directly about offering this item. f.bonetti
(posted 2017-12-22 08:50:14.637) Hi, I'm Francesco, I work at Euro.Soft, an Italian company.
I would need technical support on the use of some of your products (Quadrantal PDQ80A, LaserSource_CPS635R and KPA101) we bought to detect translations along x and y axis. Is it possible to talk to someone who can help me?
Best regards,
Francesco tfrisch
(posted 2017-12-27 03:42:06.0) Hello, thank you for contacting Thorlabs. We can help you with your application, yes. A representative will reach out to you directly. oleg.ermak
(posted 2017-10-25 22:41:11.17) We have 0.5 ns pulsed laser (green 532nm wavelength) with 30-micron spot size. What is the damage threshold of PDP90A in Watt per cm^2 and what will be expected position error for 30-micron spot size? tfrisch
(posted 2017-12-19 01:36:30.0) Hello, thank you for contacting Thorlabs. First, I want to point out that the spot size should be 200um or greater when using PDP90A. Secondly, the limit would be detector saturation before damage, and that would scale with the absolute power rather than the power density assuming the beam is larger than 200um. For a 532nm beam, the maximum output current of 40uA would be reached by about 0.1mW of optical power. The peak and average power should obey this limit. I will reach out to you directly to discuss the details of your application. julien.gamet
(posted 2017-05-15 13:02:05.04) Hi, I need to detect a beam position which moves at ~17kHz (sine). Is this PSD able to track such a signal? Thanks bwood
(posted 2017-05-16 09:32:16.0) Response from Ben at Thorlabs: Thank you for your feedback. This position measurement is governed by the bandwidth of the device. Unfortunately, for this sensor this is 15kHz, so the sensor will not be suitable for your application. Our full definition of the bandwidth specification is thus: "“The bandwidth is specified as the frequency at which the response of the sensor decreases to 3 dB below the low frequency (DC) response.
In more detail: let’s assume you set up a laser beam to sweep back and forth across the sensor, following a sinusoidal waveform. (To keep the example simple, let’s assume this sweep only takes place in one dimension, although the overall behaviour would be the same if we used an X-Y waveform.) So mathematically the X position of the beam can be described as:
X(t) = X0 * sin(2 * PI * f * t)
Where X0 is the amplitude of the signal and f is the frequency.
Now if you look at the XDIFF output of the PDP90A, you will see that it follows the position of the laser beam, so
XDIFF(t) = A * sin(2 * PI * f * t)
However, if you increase the frequency, you will see that the amplitude (A) of the response decreases with frequency. The sensor will be less and less able to keep up with the change in position and this will manifest itself as decreasing amplitude. At some frequency the amplitude will be 3 dB below the low frequency value (3 dB is about 71%) and that’s how we define the bandwidth. For the PDP90A this happens at 15 kHz.” rob.hornby
(posted 2017-04-24 16:44:49.073) Are there any recommended power supplies I could use without connecting via a T-cube or K-cube? We wish to probe the output voltages directly with a custom system but haven't found a separate power supply as straightforward as the K-cube's power supply yet. bhallewell
(posted 2017-04-26 11:02:14.0) Response from Ben at Thorlabs: We currently don't offer a power supply which can be used as standalone with the detector. We can only recommend use of the KPA101 at this time. al
(posted 2017-04-20 09:12:20.34) Hi,
Could you provide the specifications for 2D Lateral Effect Position Sensor at 1550nm?
Thanks and Regards,
Andrew tfrisch
(posted 2017-04-28 05:28:17.0) Hello, thank you for contacting Thorlabs. PDP90A uses a Si detector and will therefore be unsuitable for use at 1550nm. I will reach out to you directly about your application. albert.romann
(posted 2017-04-06 11:14:40.583) Is it still usable at 260nm? With what responsivity? jlow
(posted 2017-04-17 11:44:25.0) Response from Jeremy at Thorlabs: These detectors are not usable at 260nm. dirk.lorenser
(posted 2017-03-17 13:22:54.28) Can you please tell me the rise time (step response) for the lateral effect position sensor. From the 15kHz bandwidth I estimate a rise time of about 23 microseconds, but I need you to confirm that before I can purchase this product.
Thank you,
Dirk tfrisch
(posted 2017-03-23 11:59:02.0) Hello Dirk, thank you for contacting Thorlabs. Yes, the typical rise time would be 2.3 x10⁻⁵ seconds, 23us. dkleckner
(posted 2017-02-16 19:11:14.01) Are there any specifications on the noise performance on the quadrant photodiode? Should I expect it to be shot noise limited above some power level, and if so what is that power level? jlow
(posted 2017-03-08 02:37:55.0) Response from Jeremy at Thorlabs: This will depend on how you implement these in your system. We will contact you directly to provide more information. rchatre
(posted 2016-09-22 11:34:25.773) I'm very interested in knowing more on this product as I think it could solve one problem I have for a new medical device development (new project)
Regards jlow
(posted 2016-09-23 01:53:05.0) Response from Jeremy at Thorlabs: We will contact directly to discuss about your application. ysu
(posted 2016-05-13 19:22:08.52) Hello!
I use the PSD in the monitor mode. However I cannot find out how to save the measured voltage data in the APT software. Dose it have this function? bwood
(posted 2016-05-17 06:35:07.0) Response from Ben at Thorlabs: Thank you for your feedback. Unfortunately, APT does not have any data logging capabilities with the TPA101. However, data logging can be achieved in conjunction with certain third party software packages, like Matlab or LabView. I will be in direct contact with you with more information on how to do this. reemrafik
(posted 2016-05-04 16:01:21.48) Hi, I need to measure the position where the laser strikes after it is reflected off of a curved surface. So,is there a way to connect a focusing lens to the sensor?
Thank you besembeson
(posted 2016-05-05 10:48:30.0) Response from Bweh at Thorlabs USA: The detector has an SM05 internal thread so you can use our half inch lens tubes with external threads (SM05L05 for example: http://www.thorlabs.com/newgrouppage9.cfm?objectgroup_id=3306) to connect to the unit. These lens tubes can accommodate half inch diameter lenses. pauline.belzanne
(posted 2016-05-04 09:31:51.54) Hey,
I have a PDP90A with a TQD001 and I want to know the conversion between the voltage and the displacement?
For example, if XDIFF= 100 mV and become XDIFF=200 mV, what is the value of the displacement of the beam on the PSD?
Thanks msoulby
(posted 2016-05-05 07:00:33.0) Response from Mike at Thorlabs: The formula to calculate the position based on the X(DIFF), Y(DIFF) and SUM signals is available on our website. Please select the 'Tech Info' tab on this page for full details. ysu
(posted 2016-03-07 17:45:05.36) If I change the GUI Grid Display to 'normalized to sum signal' on computer when the controller is connected by USB, will the x, y output from the SMA be normalized as well? If not, how can I get the normalized signals? cevered
(posted 2016-03-10 12:14:16.0) Thank you for your question. We will contact you directly with more information about the SMA outputs of our TPA101. user
(posted 2016-01-22 08:19:37.257) We only want to use the Position Sensing Detector to measure the position, but we don't need the auto alignment. Is the controller necessary? jlow
(posted 2016-01-22 01:43:11.0) Response from Jeremy at Thorlabs: The TPA101 is used to provide the necessary drive voltage and also route the voltage signal for the SUM, X, and Y to the SMA outputs on the back. If you do not use the TPA101, you can get the TC200CAB10 cable, cut off one end of the connector, and wire in your drive voltage and your voltage probes yourself. john.harchanko
(posted 2015-04-02 10:13:51.85) We have the PDP90A connected to the TPA101 and illuminate the PDP90A with a laser beam. The software does not display the numerical X-Y position of the beam! It only displays a graphical representation. I see one other poster having the same problem from a couple of years ago. Is there a solution? msoulby
(posted 2015-04-08 08:15:49.0) Response from Mike at Thorlabs: Quadrant detectors are used primarily for beam alignment whereas lateral effect sensors are normally used for position measurement. However, the TPA101 can be used with either type of sensor for both auto-alignment and position measurement. Both types of sensor output three voltages (XDiff, YDiff and SUM) that are proportional to the position of the beam and the total optical power, however, lateral effect sensors like the PDP90A have a defined accurate relationship between these three voltages. Furthermore, if the user selects the PDP90A sensor type in the settings panel in the APT USER software the displays shows the XPos and YPos values in millimeters, whereas if the PDQ80A or PDQ30C sensor type is selected, the display shows the XDiff and YDiff values that the sensor outputs in Volts. The TPA101 always reads the voltages, but additionally for the PDP90A sensor, it is capable of calculating the exact X, Y position from these voltages. harkeman
(posted 2015-02-12 13:35:57.113) Hello, I am interested in using this sensor for pointing stabilization for a ~40 fs, 780nm pulse with a 1 kHz rep rate. Would this detector give a continuous signal for the beam position, or would it be choppy because of how short the pulse is? jlow
(posted 2015-02-24 04:17:56.0) Response from Jeremy at Thorlabs: The detector should be able to differentiate between each pulse because of the rep. rate relatively low so it won't be a continuous signal. I will contact you directly to discuss about your application. suntaree
(posted 2015-01-29 21:15:47.02) Please advise part number : PDP90A product made in country ?????
Suntaree Yuenyongwattanakorn
Inhouse Sales Section Head
Globaltronic Intertrade Co., Ltd.
634/2 Soi Ramkhamhaeng 39 (Thepleela1), Wangthonglang, Bangkok 10310, Thailand
HP : 08-5480-1464
TEL : 0-2530-9099 (Auto), 0-2935-6799 (Auto) ext. 213
FAX : 0-2935-6790,0-2530-9077
www.gti.co.th jlow
(posted 2015-01-30 04:54:10.0) Response from Jeremy at Thorlabs: The PDP90A is assembled in USA. bender
(posted 2014-05-28 13:22:42.24) I see in some past comments that other customers were interested in accessing signals from the detector without the controller. I'm interested in the PDP90A - could you give recommendations on what input impedance I should have to read signals from the PDP90A in the absence of a TPA101 controller? Thanks. besembeson
(posted 2014-06-03 02:33:51.0) A response from Bweh at Thorlabs in Newton-USA: Thanks for contacting Thorlabs. The recommended impedance is >=10kohm. paul.taylor
(posted 2013-08-18 09:47:18.603) I'd like to use the PDP90A with a 1 Watt Q-switched 355 nm laser with 30 microJoule per pulse and a rep rate of 30 kHz. Is there an issue of using the detector with a pulsed laser or does it just average? I would like to monitor the position of the beam after going through a lens. I will place the sensor after the beam has gone through focus - so the spot size can be set to optimum - but the beam will not be collimated - is that an issue?
Thanks jlow
(posted 2013-09-17 15:18:00.0) Response from Jeremy at Thorlabs: A 1W laser would be too powerful for the PDP90A and you can damage the detector. Typically if the repetition rate of your source is a lot higher than the bandwidth of the detector (15kHz in the case of PDP90A), then the detector would just average out the signal and it should still be able to give you the position information. We will contact you directly to discuss about this further. jericho163
(posted 2013-08-05 23:11:35.067) PDP90A
Recommended spot size 0.2mm-7mm.
Can I use a smaller spot size? Is there any issue? pbui
(posted 2013-08-08 14:55:00.0) Response from Phong at Thorlabs: We recommend using a spot size > 0.2 mm, since a smaller spot size could increase the the position detection error. user
(posted 2013-07-10 14:14:50.71) What is the typical rise time for this detector? tcohen
(posted 2013-07-16 20:04:00.0) Response from Tim at Thorlabs: The rise time is ~2.3*10^-5 seconds. patrick.lu
(posted 2013-03-07 21:27:29.993) Is there a way to read a physical position using this detector? We just purchased it, but it looks like the provided software only gives a voltage differential when we illuminate the detector with a laser. It is important for our application that we be able to measure the x-y coordinates of the beam. jlow
(posted 2013-03-12 12:59:00.0) Response from Jeremy at Thorlabs: You could use the PDP90A to read the position. This information can be found under the "Tech Info" tab on the PDP90A page (http://thorlabs.com/NewGroupPage9.cfm?ObjectGroup_ID=4400&pn=PDP90A). tcohen
(posted 2012-02-24 10:33:00.0) Response from Tim at Thorlabs: The output signal can be recorded with a NI DAQ card. You will need some software for controlling the card, but you will not need any software from us. If you have any further questions, you can contact us directly at techsupport@thorlabs.com. ansonwu0225
(posted 2012-02-22 22:49:27.0) Can TQD001 output signal (LV OUT XDIFF\YDIFF \SUM) receive by NI DAQ card (Analog receiver) without any software? tcohen
(posted 2012-02-21 16:30:00.0) Response from Tim at Thorlabs: When used with the TQD001 control module the position sensing detectors can be run with our APT software. By clicking on the red page icon next to the TQD001 product number, you can view the manual which has information on the software and the methods for use with LabVIEW. You can also view the manual at http://www.thorlabs.us/Thorcat/17800/17869-D01.pdf. The SPLICCO software, our standard software package for spectrometers and line cameras, is not needed for use with the position sensing detectors. The SPLICCO software is located at http://www.thorlabs.us/software_pages/ViewSoftwarePage.cfm?Code=SPLICCO and the APT software for use with the TQD001 and our position sensing detectors can be located at http://www.thorlabs.us/support.cfm?section=7&PageRef=8. ansonwu0225
(posted 2012-02-21 04:32:37.0) Is there any Versatile Software Package (Splicco) and Drivet Package (""""For LabVIEW"""") bdada
(posted 2011-12-13 20:23:00.0) Response from Buki at Thorlabs:
A 10m cable will work but we do not have any performance data for various lengths. Please contact TechSupport@thorlabs.com if you have additional questions. user
(posted 2011-11-18 09:35:22.0) is there a limitation on cable length for the distance between the PDP90A and the TQD001? If we extend the cable to 10m, what will happen to the signal integrity/strength? bdada
(posted 2011-11-02 18:18:00.0) Response from Buki at Thorlabs:
Thank you for your feedback. We are currently redesigning these detectors to include access to each of the output signals (x, y, and sum) through SMC connectors. We will contact you to provide more information. user
(posted 2011-11-01 20:27:31.0) A breakout cable or adapter with provides signal outputs on BNC connectors would be very useful. The controller is not needed in our application. dario.perez
(posted 2011-09-15 17:12:05.0) On the PDP90A how good is the linear response to the displacements? That is, how far from the detector center can I have the ray and still use the linear approximation. Thx. jjurado
(posted 2011-08-08 11:54:00.0) Response from Javier at Thorlabs to cchipman: The distance between the active area of the PDP90A and the front plane of the housing is 3.5+/-0.5 mm. cchipman
(posted 2011-08-05 13:31:58.0) The depth of the detector within the housing for the PDP90A is not detailed in your drawing (At least that I can find). What is it? Greg
(posted 2011-01-11 11:04:13.0) A response from Greg at Thorlabs to infante.cristian: I apologize for the delay in getting back to you. An applications engineer will be in contact with you shortly to discuss centroid detection. infante.cristian
(posted 2010-12-31 01:45:28.0) Im new in optical applications, and i need to calculate the beam centroid with PDP90A. For my application, i will integrate (approx. 10Hz) and sample the outputs, i think that this will decrease error for my application (alignment and tracking) but im not sure. lease mail me to discuss this and other products for centroid detection. Thanks! Thorlabs
(posted 2010-08-10 23:51:57.0) Response from Javier at Thorlabs to kvasnicka: Thank you for your feedback.
A1: The 300 uVrms noise figure is guaranteed over the entire bandwidth of the detector (15 kHz). In reality, the noise is much lower, but we keep this conservative value based on the noise floor of our oscilloscope (HP Infinium 1.5GHz). The total calculated noise values are approximately 51 uVrms (I will send you Excel files with calculations and data).
A2: At 1 Hz, the total noise decreases to about 0.41 uVrms.
A3: At max. optical power, the detector and amplifier circuits are saturated by high input intensity, compromising the reliability of the measured signal.
A4: The PDP90A is not shot-noise limited. In reality the environmental noise should be more of a problem. Laser intensity noise could add to the overall performance, however simultaneously sampling all 3 outputs should minimize this. Background light will certainly add to the errors but in most cases this can be dealt with. Temperature is a larger problem. Ambient temperature changes will affect the accuracy of the readings. The sensor is made up of a standard large area Si photo detector mounted to a resistive subsurface. The position information is distributed to the 4 corners of the sensor based on this proportional resistance to each corner. Temperature changes can affect this resistive network and move the relative position. The worst case occurs when there are temperature gradients across the sensor. Sealing the sensor from air flows will improve this. How well the ambient temperature is controlled will also have an effect.
For digitizing the output, if you were to use a 16 bit A/D card set to a +/-5V input range, the 1 bit resolution is 10V/2^16 = ~150uV. Notice that the calculated values of the noise are less than the resolution of the A/D. Our safe number of 300uV is approximately 2 bits of noise in a 16 bit A/D. This is better than what most cards can specify. For better resolution there are 20 bit cards available. Thorlabs
(posted 2010-07-02 10:39:24.0) Response from Javier at Thorlabs to reynolds.gw.2: thank you for your feedback. The main purpose of the application idea is to show the type of components that you could potentially need to create an active auto-alignment setup for applications in which experimetal results are highly dependent on the alignment of the laser with respect to the optics. There are many factors that contribute to the loss of alignment of a laser in a setup, most of which you mentioned. Thermal drift is perhaps one of the main effects. You can have environmental thermal drift, which can affect the mounting mechanics of the laser (most mounting optomechanics use Aluminum as the main material, which has a high coefficient of thermal expansion), or internal thermal effects that affect the beam pointing stability of the laser. This can be critical in application such as fiber coupling. Also, mechanical vibrations can have negative effect in many experiments, which can be corrected for by using a quadrant or lateral effect sensor. I will contact you directly to discuss your application and the possible uses of these alignment detectors. reynolds.gw.2
(posted 2010-07-02 08:41:15.0) Hello,
Im relatively new to the (vast) world of experimental optics. Ive greatly enjoyed browsing your catalog...particularly the application ideas with various products.
I recently was looking at your 4 quadrant photo diode position detectors PDQ80A and PDP90A. In the application idea, you have an application idea for an auto-alignment setup.
Its not clear to me, however, what experimental problem this application is trying to solve. Perhaps a sentence or two in the description would greatly help us newbies. Thus, as we encounter problems, we can look at your applications and discover exactly how the pros solve the problem that we may experience.
In the application, why would the laser beam move around? What advantage does the setup give that makes it supierior to locking down the laser on the table? Thermal drift? Mechanical Vibrations? Laser variability?
Thanks,
Geoff |

| Item # | PDQ80A | PDQ30C |
|---|---|---|
| Material | Si | InGaAs |
| Wavelength Range | 400 - 1050 nm | 1000 - 1700 nm |
| Detector Bandwidth | 150 kHz | 150 kHz |
| Recommended Spot Size | Ø1.0 - 3.9 mm | Ø0.2 - 0.5 mm |
特長
- 4分割位置センシングディテクタ(PSD)
- 可視域または近赤外域用
- 自動アライメントに適した製品
- SM05レンズチューブに対応
- コンパクトな設置サイズ
当社は、2種類の4分割ディテクタ用にさまざまなコヒーレント光源を用意しております。これらのレーザ(コヒーレント光)の概要は「推奨レーザ」タブでご覧いただけます。 特定の光検出の設定に関しては、当社までお問い合わせください。
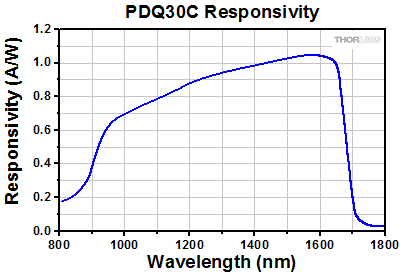
ディテクタPDQ80AおよびPDQ30Cは、それぞれ400~1050 nmまたは1000~1700 nm範囲の光を精密アライメントするための、4分割位置センシングディテクタです。各ディテクタ上の6ピンHiroseコネクタは、入射ビームのパワー分布(つまり位置)に比例した信号を出力します。適切な結果を得るためには、1 mW(センサの線形領域)以内のパワーと指定範囲内のビーム径の光線で、4分割ディテクタを使用してください。
4分割ディテクタには、#8-32 - M4 アダプタが付属しており、ミリ規格とインチ規格の両方のポストに対応できるようになっています。
コントローラ
PDQ80AとPDQ30Cは、別売りのコントローラKPA101(上記参照)がご使用いただけます。このK-Cube™ビーム位置アライナKPA101は、当社のKinesis®シリーズのコンパクトな高性能モーションコントローラです。当社の4分割位置センサならびにラテラル効果位置センサーヘッド製品に接続して、センサ上のビーム位置を測定したり(開ループモード)、自動ビームステアリング素子への入力信号を生成したり(閉ループモード)するためにお使いいただけます。この製品は、K-Cubeピエゾコントローラ&ひずみゲージリーダKPC101と組み合わせて閉ループビームステアリングを行うのに適しています。詳細はこちらの製品紹介ページをご参照ください。
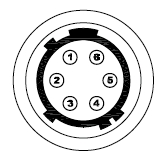
| Pin # | PDQ80A | PDQ30C |
|---|---|---|
| 1 | X-Axis | |
| 2 | Y-Axis | |
| 3 | Sum | |
| 4 | +V (5 to 15 V) | |
| 5 | Common | |
| 6 | -V (-5 to -15 V) | |
6ピンヒロセコネクタ
(詳細は「ピン配列」タブをご覧ください)
| Item # | PDQ80A | PDQ30C |
|---|---|---|
| Substrate | Si | InGaAs |
| Wavelength Range | 400 - 1050 nm | 1000 - 1700 nm |
| Photodiode Diameter | Ø7.8 mm | Ø3.0 mm |
| Gap Size | 42 μm | 45 µm |
| Detector Bandwidth | 150 kHz | 150 kHz |
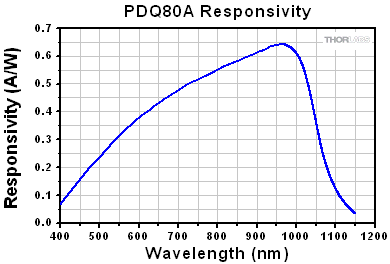
| Responsivity | 0.45 A/W @ 633 nm | 1 A/W @ 1630 nm |
| Transimpedance Gain | 10 kV/A | |
| Breakdown Voltage | 15 V | 10 V |
| Housing Dimensions | 2.0" x 1.20" x 0.65" (50.8 mm x 30.5 mm x 16.5 mm) | |
| Cable Length | 5 ft (1.52 m) | |
| Mounting Threads | 8-32 (with M4 Adapter Included) | |
4分割位置センシングディテクタ
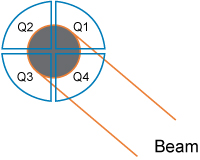
4分割位置センサは、 4分割されたフォトダイオードで構成されています。それぞれのフォトダイオードは、約0.1 mmのギャップで隔てられており、4つ合わせた検出領域は入射光位置の2次元測定が可能なように円形となっています。センサに光が入射される際、光電流が各部(右図でQ1、Q2、Q3、Q4と表示)にて検出されます。適切なA/Dコンバータを用いて、これらの信号から差分信号を検出できます。正規化の目的のために、全4つの和信号も検出されます。光の位置に対する正規化座標(X、Y)は、次の方程式により求めることができます。


対称ビームがセンサの中央に配置されている場合、4つの同等の光電流が検出され、差分信号はゼロとなります。そのため正規化座標は、(X、Y) = (0、0)となります。ビームが中心から外れると、光電流は変化します。その結果、センサの中心からのビーム変位により差分信号を生じさせます。
このセンサは非常に精密で自動アライメント用途に適していますが、入射ビームの形状と密度分布には注意が必要で、この2つの要素の影響を大きく受けます。ガウスパワー分布を有しないビームでは、ビームの幾何学的中心ではなく、パワー密度の中心に基づいて位置検出されてしまいます。この種類のビームには、ラテラルセンサの方が適しているでしょう。
ディテクタ出力 - HIROSE
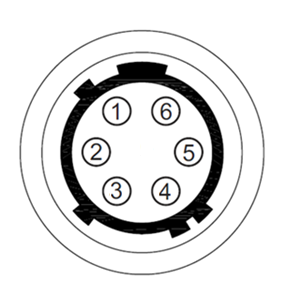
フォトダイオード詳細

| Pin | PDQ80A | PDQ30C |
|---|---|---|
| 1 | X-axis [Q2 +Q3] - [Q1 + Q4] | |
| 2 | Y-axis [Q1+Q2] - [Q3 + Q4] | |
| 3 | SUM [Q1 +Q2 + Q3 + Q4] | |
| 4 | +5 V to +15 V | |
| 5 | Common | |
| 6 | -5 V to - 15 V | |
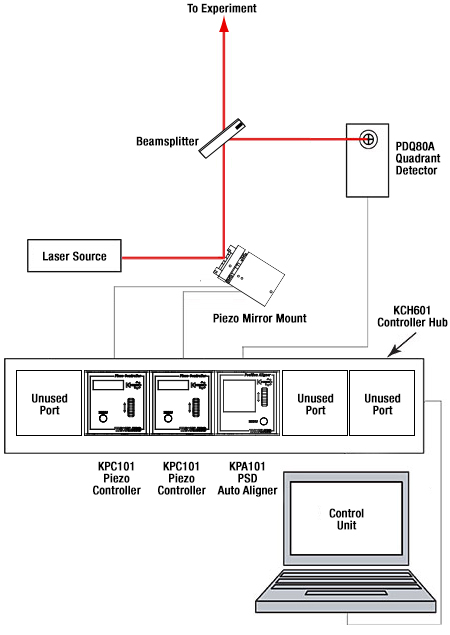
一般的な自動アライメントのセットアップ
自動アライメントセットアップ例
右は基本的な自動アライメントのセットアップ図です。フォトダイオードセンサPDQ80A、ビーム位置調整用アライナKPA101、2台のK-Cubeピエゾコントローラ&ひずみゲージリーダKPC101、 ピエゾ駆動の2軸ミラーマウントASM003(旧製品、代替品はこちらからご覧いただけます)、レーザ光源、PCで構成されています。このシステムは、レーザ光のパワー密度に基づいてレーザビームがディテクタアレイの中心にくるような位置決めしたり位置を保持するのに用いられます。

Click to Enlarge
自動アライメントのセットアップ例
上の写真にある実験セットアップは、右の図に基づいて作られています。レーザ光源としては波長635 nmの赤色半導体モジュールLDM635が用いられています。光はフレクシャーステージMBT616D上に取り付けられたミラーマウントASM003(旧製品、写真中央、上)に入射します。90°偏向ミラーのX軸とY軸は、2台のKPC101ユニット(写真には表示されていません)で制御されます。なお、ピエゾ素子によるビームのアライメント調整は、小さな範囲に限られる点にご留意ください。90°偏向ミラーは光をペリクルビームスプリッタBP150へ向けます。このビームスプリッタによって透過された光は実験セットアップ上で最後まで伝搬します(写真には表示されていません)。一方で反射された光は、オートアライナKPA101(写真には表示されていません)が制御する4分割センサPDQ80A(写真の後部右)へ向けられます。
4分割PD位置ディテクタを使用する際、適切なアライメントレーザの選択は不可欠です。レーザの波長、ビーム径、パワー全てがシステムの性能に大きな影響を及ぼします。当社の4分割PDディテクタとの使用に適した光学部品は多く存在しますが、下記のレーザと光学部品は、その費用対効果と使い勝手の良さから推奨できます。
当社の4分割PDディテクタで使用されているようなフォトディテクタの入射光は、線形応答性のために、1 mW以内であることが望まれます。ビームスプリッタは一般的に自動アライメントシステムで使用され、ディテクタに入力する光量を小さくすることができます。光学装置によっては、レーザの光出力をさらに低下させる必要があるでしょう。それは当社のK-Cubeレーザの光出力調整用ノブを使って行えます。
ファイバーパッチケーブルは各々長さ2 mで、光源のファイバの種類に応じたものを推奨いたします。当社では多様な種類のコリメータをご提供していますが、ここでは調整可能型コリメータで、当社の4分割PDディテクタと共に使用する上で、適したサイズのビーム径のものを推奨いたします。コリメータの取り付けはさまざまな方法で行えますがVC1/Mはほとんどの用途に適した汎用性の高いソリューションです。
PDQ80A対応
- 波長範囲: 400~1050 nm
- 入力ビーム径: 1~3.9 mm
- 最大入射電力(線形応答): 1 mW
| Laser | Laser Description | Power Supply | Fiber (2 m Length) | Collimator |
|---|---|---|---|---|
| KLS635 | 635 nm, 8.0 mW Fiber-Coupled K-Cube Laser | KPS201 | P1-630A-FC-2 | CFC11P-A |
PDQ30C対応
- 波長範囲: 1000~1700 nm
- 入力ビーム径: 0.2~0.5 mm
- 最大入射電力(線形応答): 1 mW
| Laser | Description | Power Supply | Fiber (2 m Length) | Collimator |
|---|---|---|---|---|
| KLS1550 | 1550 nm, 7.0 mW Fiber-Coupled K-Cube Laser | KPS201 | P1-SMF28E-FC-2 | CFC2-C |
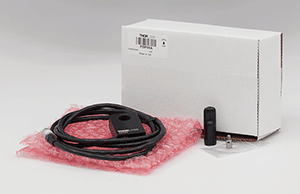
Click to Enlarge
PDP90A Packaging

| Item # | % Weight Reduction |
CO2-Equivalent Reductiona |
|---|---|---|
| PDP90A | 34.45% | 13.66 kg |
| PDQ80A | 34.45% | 9.87 kg |
Smart Pack
- Reduce Weight of Packaging Materials
- Increase Usage of Recyclable Packing Materials
- Improve Packing Integrity
- Decrease Shipping Costs
Thorlabs' Smart Pack Initiative is aimed at waste minimization while still maintaining adequate protection for our products. By eliminating any unnecessary packaging, implementing packaging design changes, and utilizing eco-friendly packaging materials for our customers when possible, this initiative seeks to improve the environmental impact of our product packaging. Products listed above are now shipped in re-engineered packaging that minimizes the weight and the use of non-recyclable materials.b As we move through our product line, we will indicate re-engineered packages with our Smart Pack logo.
| Posted Comments: | |
heidi.cattaneo
(posted 2018-06-19 11:16:29.707) I would like to know the noise and position resolution of PDQ80A.
Kind regards,
Heidi Cattaneo YLohia
(posted 2018-06-19 10:15:34.0) Hello Heidi, thank you for contacting Thorlabs. At the moment, unfortunately, our engineers have not measured the voltage noise for these detectors or the NEP of the photodiode. You can roughly estimate your signal to noise ratio for a CW source using the responsivity of your source/dark current value multiplied by the transimpedance gain. The resolution of the detector depends on the controller or the analog to digital conversion and the noise in the electronics. Please note that we do not recommend to use this detector for applications in nanometer range, if that is what your application needs. The PDQ80A is made up of four different sensors with a 42µm gap between them. Specifying a resolution becomes tricky due to that gap. bluehwale
(posted 2017-07-18 15:15:43.35) To whom it may concern
Hi
This is JinjuPark
I'm a user of products of PDA80A, KPA101.
They're working perfectly but I'm wondering the absolute value of displacement when the beam is moving.
I'm using APT program to see the position difference more accurately but this program also does not indicate the Absolute displacement length.
So I hope you to let me know that absolute length of 1 tick on PSD APT program.
Thank you. tfrisch
(posted 2017-08-11 10:59:41.0) Hello, thank you for contacting Thorlabs. Unlike a lateral effect sensor, a quadrant detector cannot give the absolute position. The signal from each of the 4 diodes is dependent on beam size, shape, and power distribution. The most common application is to monitor whether the beam position is changing in beam steering applications. I will reach out to you directly to discuss this further. Greg
(posted 2011-01-11 10:55:21.0) A response from Greg at Thorlabs to infante.cristian: Based on your feedback, I have added the Hirose pin diagram to the Specs tab. We will contact you to discuss centroid detection. infante.cristian
(posted 2010-12-31 01:32:27.0) Im very interested on using PDQ80A to detect the beam centroid. Q1: What signals are available in the outputs (6-pin Hirose)?.
Please mail me to discuss this and other products for centroid detection.
Thanks! m.j.rossewij
(posted 2010-08-11 16:15:42.0) To handle less intensive light sources, is it possible to increase the gain of the PDQ80A? |

| Item # | KPA101 |
|---|---|
| X & Y Difference Outputs | -10 to 10 V, SMA Connectors |
| Sum Output | 0 to 10 V, SMA Connector |
| Quadrant Detector Input | 6-Pin Hirose Connectora |
| Closed-Loop Bandwidth | Up to 1 kHzb |
| Monitor Mode Bandwidth (-3.0 dB) | 100 kHz |
| Dimensions (W x D x H) | 60 mm x 60 mm x 49.2 mm (2.36" x 2.36" x 1.94") |
特長
- コンパクトな設置サイズ:60.0 mm x 60.0 mm x 49.2 mm
- 閉ループモードでのセンサ中心へのビームの自動アライメント
- 開ループモードでのビーム位置の測定
- ユニット上でのフル制御が可能な有機EL(OLED)メニューおよび位置ディスプレイ
- 和信号、差信号、およびフィードバック信号の電圧出力
- Kinesis®またはAPT™制御用ソフトウェア一式(詳細は「モーションコントロールソフトウェア」のタブをご覧ください)
- ソフトウェアは他のKinesisならびにAPTコントローラにも対応しており、統合システムの開発が可能
- USBコントローラーハブ(別売り)による多軸拡張も可能
- 磁石と固定用クリップの付いた光学テーブル取付け用アダプタが付属
K-Cube™ビーム位置アライナKPA101は、当社の新しいKinesis®シリーズのコンパクトな高性能モーションコントローラです。当社の4分割位置センサならびにラテラル効果位置センサーヘッド製品に接続して、センサ上のビーム位置を測定したり(開ループモード)、自動ビームステアリング素子への入力信号を生成したり(閉ループモード)するためにお使いいただけます。 この製品は、K-Cubeピエゾコントローラ&ひずみゲージリーダKPC101と組み合わせて閉ループビームステアリングを行うのに適しています。KPA101を他社製のセンサと組み合わせて使用する方法に関しては、当社までお問い合わせください。
ユニットは組み込みソフトウェアにより、ユニット上のメニューボタン、ディスプレイ、制御ホイールを使用するか、または外部トリガ信号を使用して位置センシングディテクタ(PSD)と通信できます。 ユニット上での制御に加え、USBで接続したPCで操作するのも容易です。当社では新しいKinesisソフトウェアパッケージと従来のAPT™(Advanced Positioning Technology)ソフトウェアパッケージの2種類をご用意しております。
Kinesisソフトウェアでは.NETコントロールが使用でき、最新のC#、C++、Matlab、LabWindows/CVI、Visual Basic、LabVIEW™、その他の.NET対応言語を使用する開発者がカスタムプログラムを作成することもできます。当社の従来のAPTソフトウェアを使用した場合は、ActiveX®プログラミング環境を利用して複雑な動作シーケンスを素早く設定できます。例えば、当社のステージおよびアクチュエータの動作に関連するあらゆるパラメータはこのソフトウェアによって自動的に設定されます。2つのソフトウェアパッケージの詳細については、「モーションコントロールソフトウェア」、「Kinesisチュートリアル」ならびに「APTチュートリアル」タブをご覧ください。
ユニットの設置面積は60.0 mm x 60.0 mm x 49.2 mmと非常にコンパクトで、上面パネルのコントローラを使用する際にシステムの近くに配置できるのも便利な点です。テーブル上で操作することにより駆動ケーブルの長さが短くなり、ケーブルの管理も楽になります。ユニットの前面には電源スイッチが付いており、このスイッチをオフにすると全てのユーザ設定が保存されます。ユニットの電源を切るときには、必ずこのスイッチをオフにするようにしてください。KPA101には長さ1.5 mのA-MicroBタイプのUSB 3.0ケーブルが1本付属します。
動作
K-Cube KPA101はユニット上で手動操作するほかに、USBで接続したPC上で当社の新しいKinesisソフトウェアパッケージまたは従来のAPT(Advanced Positioning Technology)ソフトウェアパッケージを利用して操作することができます。このオートアライナは、どちらの方法で操作しても、開ループならびに閉ループのどちらのモードでも動作可能です。これらの2つのモードでは、X軸方向の差信号(左の和信号-右の和信号、X DIFF)やY軸方向の差信号(上の和信号-下の和信号、Y DIFF)、そして総和信号(SUM)を生成し、ターゲット画面に表示します。
開ループモードでは、ターゲット画面に表示される差信号のX DIFFとY DIFFは、ユニット背面のSMAコネクタの出力信号とは一致しません。X DIFFとY DIFFのSMA出力信号は位置要求信号であるX OUTならびにY OUTを表しますが、ゼロもしくは閉ループ動作時の最後の値に固定されています。開ループモードではディテクタの手動アライメントが可能です。おおよそのアライメントができたらユニットを閉ループモードに設定し、システムの自動アライメントを開始することができます。
閉ループモードでは、KPA101内部のDSPプロセッサによりX DIFFならびにY DIFFの位置要求信号が出力され、2つの独立したフィードバックループが動作します。ユニット背面のSMAコネクタから出力されたそれらの信号は、ビームの方向を操作するための素子への入力信号として用いられ、ビームはディテクタの中央にくるように制御されます。比例、積分、微分(PID)の各定数は調整可能で、ターゲット位置の変化に対するフィードバックループの応答性を微調整することができます。 浮動小数点演算を行うので、制御ループのPID定数の選択の幅が広く、それにより高精度と低ノイズが実現されています(詳細はマニュアル内の「Appendix B」をご覧ください)。また、オートアライナを用いて安定化できるアクチュエータの種類も広がります。さらに、ユニットにはノッチフィルタが内蔵されており、このユニットを組み込んだシステム特有の自然共鳴の影響を防ぐことができます。これによりジンバル式ピエゾミラーマウントのように機械的共振の影響を受けやすいアクチュエータでも安定化することができます。
ユニットをUSBインターフェイス経由で制御すると、ユニットの開ループ出力もデジタル値でPCに送られます。なお、安定した閉ループ動作が可能なのは連続発振(CW)レーザのみです。K-Cube KPA101をパルスレーザに対して使用することはお勧めしません。
光学テーブル取付け用プレート
ユニットにはモジュールのベース部分にクリップで固定できる取付けプレートが付属します。プレートには2つの磁石が付いており、光学テーブルに一時的に設置する際にご使用いただけます。また、恒久的に取り付けるためのM6キャップスクリュ用ザグリ穴も2つ付いています。プレートの取付け方法については「取付けオプション」タブをご参照ください。
電源の選択
K-Cube KPA101には電源が付属しません。電源TPS002またはコントローラーハブと電源のセットKCH301またはKCH601を使用することができます。電源TPS002は標準的な壁コンセントに差し込むことで、最大2台のK-CubeまたはT-Cubeに±15 VDC、+5 VDCの電源を供給します。KCH301ならびにKCH601は、標準サイズのK-Cubeを最大3台(KCH301)または6台(KCH601)まで搭載できるハブと、標準的な壁コンセントに差し込むことでハブとそれに接続された全てのキューブに電力を供給する電源の2つの部分から構成されています。
USBコントローラーハブは1つのUSB接続によりハブに繋がっているすべてのK-CubeならびにT-Cubeを制御可能とします。また、KPA101をK-Cubeピエゾコントローラ&ひずみゲージリーダKPC101などのビームステアリングコントローラと組み合わせて閉ループモードで使用する場合、ハブで接続されていればCube同士で直接通信させることも可能です。その結果、閉ループモードで動作しているKPA101が生成するフィードバック信号を、ビームステアリング素子を駆動するピエゾコントローラKPC101へ直接送ることができます。
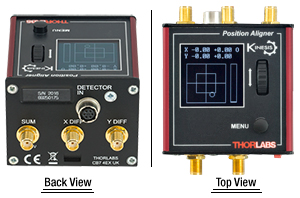
SUM、LV OUT XDIFF、およびLV OUT YDIFFSMAメス型 | TRIG 1SMAメス型 | TRIG 2SMAメス型 |
 |  |  |
| コネクタからの3種類の出力信号:ディテクタに当たった全光量(SUM)に比例した信号、X軸アライメント用の[左の光量-右の光量](LV OUT X DIFF)の信号、およびY軸アライメント用の[上の光量-下の光量](LV OUT Y DIFF)の信号。 出力インピーダンス: 470 Ω X DIFF & Y DIFF: -10 V ~ +10 V SUM: 0 V ~ +10 V | +5 V TTL | +5 V TTL |
| これらのコネクタからは5 Vのロジックレベルの信号を入出力します。トリガ信号を外部機器に出力する、あるいは外部機器から入力するかについては設定することができます。それぞれのポートでロジックレベルの調整や、トリガの入力あるいは出力の設定が可能です。 入力に設定した場合のインピーダンス: 100 kΩ 出力に設定した場合のインピーダンス: 620 Ω | ||
電源コネクタ
ミニDINメス型
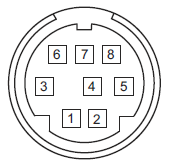
| Pin | Description | Pin | Description |
|---|---|---|---|
| 1 | +5 V (120 mA Max) | 6 | Common Ground |
| 2 | +5 V (120 mA Max) | 7 | Common Ground |
| 3 | -15 V (50 mA Max) | 8 | Common Ground |
| 4 | +15 V (50 mA Max) | Shield | Common Ground |
| 5 | +5 V (120 mA Max) |
PC接続用コネクタ*

*このUSB3.0のポートにはUSB2.0のMicro-Bタイプコネクタを接続することもできます。その場合は上図の網掛け部分に接続します。KPA101にはAタイプ-Micro-BタイプのUSB 3.0ケーブルが1本付属します。
K-Cube取付けオプション
K-Cubeコントローラの光学テーブルへの固定方法を2種類ご用意しております。1つは光学テーブル取付けプレートで、すべてのK-Cubeに付属しており、1台のコントローラを光学テーブルに取り付けることができます。もう1つは、3ポートあるいは6ポートのUSBコントローラーハブ(別売り)で、当社のK-Cubeコントローラを取り付け、それらに電力を供給することができます。詳細は下記をご覧ください。
光学テーブル取付けプレート
各ユニットには、コントローラのベース部分をクリップで固定できる取付けプレートが付属します(下の動画参照)。プレートには2つの磁石が付いており、光学テーブルに一時的に設置する際にご使用いただけます。また、2つのM6キャップスクリュ用ザグリ穴は、恒久的に取り付ける際にご使用ください。
Kinesis USBコントローラーハブ
USBコントローラーハブKCH301やKCH601を用いると、複数のユニットを取り付けて、それらを1台のPCに接続することができます。 コントローラーハブは、3台(KCH301)もしくは6台(KCH601)のK-CubeやT-Cubeをサポートするハブ部分と、壁コンセントに接続して電力を供給する電源部分から構成されています。K-Cubeはユニットについているクリップで簡単にハブに取り付けられますが、T-Cube(現製品および旧製品)の取り付けには、下の動画のようにアダプタープレートKAP101が必要です。 複数のコントローラをお使いになるときには、ハブをご使用になるとUSB用と電源用のケーブル本数を大幅に削減することができます。
K-Cube用光学テーブル取付けプレート
Kinesis USBコントローラーハブ
3ポートまたは6ポートのUSBコントローラーハブを用いると、多軸の操作をする際に複数のコントローラを1台のPCに接続することができます。K-Cubeはハブに直接取り付けられますが、T-Cubeの取り付けにはアダプタープレートKAP101が必要です。
| K-Cube vs. T-Cube™ Feature Comparison | ||
|---|---|---|
| Feature | KPA101 K-Cube | TPA101 T-Cube |
| Kinesis Software Compatibility | ||
| APT Software Compatibility | ||
| Kinesis USB Controller Hubs Compatibility | Requires KAP101 Adapter | |
| TCH002 T-Cube USB Controller Hubs Compatibility | N/A | |
| OLED Position Display | N/A | |
| Power Switch | N/A | |
| Bidirectional SMA Trigger Porta | 2 | N/A |
| SMA SUM, X Diff, and Y Diffa | ||
| Computer Connectiona | USB 3.0 Micro B (USB 2.0 Compliant) | USB 2.0 Micro B (USB 2.0 Compliant) |
| Included Mounting Plate | ||
| Size (L x W x H) | 60.0 mm x 60.0 mm x 49.2 mm (2.36" x 2.36" x 1.94") | 60.0 mm x 60.0 mm x 49.2 mm (2.36" x 2.36" x 1.94") |
| On-Unit Menu | ||
| Open Loop Mode | ||
| Closed Loop Mode | ||
| Monitor Mode | ||
| Automatic Loop Switching | N/A | |
| Screen Brightness | N/A | |
Kinesis®モーションコントローラのご紹介
旧世代のT-Cube™製品から大幅に改良されたK-Cube™のラインナップでは、新しいKinesisソフトウェアの導入だけでなく、物理的設計やファームウェアの全面的な見直しも行い、汎用性を高めています。
すべてのK-Cubeコントローラにはデジタルディスプレイが付いています。KPA101の有機ELディスプレイは基本的な入出力情報の表示を行うだけでなく、モニタ、閉ループ、開ループ、閉/開ループの自動切換えなどを含む様々なメニューが選択可能です。ユニットのホイールとメニューボタンにより、利用可能な機能がスクロールできます。またユニットの前面には電源スイッチが付いており、オフにすると、双方向性があり、5 V TTLロジック信号を入出力する2つのSMAトリガーポートの設定を含むすべての調整可能な設定が保存されます。
K-Cube PSD用コントローラKPA101と旧世代T-Cube TPA101の機能の全比較については右の表をご覧ください。

Click to Enlarge
K-Cube Kinesis PSD用コントローラKPA101
Kinesis USBコントローラーハブ
Kinesis USB 2.0コントローラーハブは、K-Cubeコントローラの機能を補完する製品です。USBハブには3台用と6台用の2種類があり、複数のK-CubeやT-CubeのコントローラがホストPCと通信できるように設計されております。これらのハブはT-Cube製品との互換性があります。
K-Cubeはユニットについているクリップで簡単にハブに取り付けられますが、T-Cube(現製品および旧製品)の取り付けには、右下の動画のようにアダプタープレートKAP101が必要です。 複数のコントローラをお使いになるときには、ハブをご使用になるとUSB用と電源用のケーブル本数を大幅に削減することができます。
K-Cube用光学テーブル取付けプレート
T-Cubeとは異なり、すべてのK-Cubeにはコントローラをベースに固定するための取付けプレートが付属します。プレートには2つの磁石が付いており、光学テーブルに一時的に設置する際にご使用いただけます。また、恒久的な取り付けに使用できるM6キャップスクリュ用ザグリ穴も2つ付いています。
Kinesis USBコントローラーハブ
3ポートまたは6ポートのUSBコントローラーハブを用いると、多軸の操作をする際に複数のコントローラを1台のPCに接続することができます。K-Cubeはハブに直接取り付けられますが、T-Cubeの取り付けにはアダプタープレートKAP101が必要です。
当社では幅広い種類のモーションコントローラを駆動できるよう、Kinesis® ソフトウェアパッケージと従来のAPT™(Advanced Positioning Technology)ソフトウェアパッケージの2種類のプラットフォームをご用意しております。どちらのパッケージも小型で低出力のシングルチャンネルドライバ(K-Cube™やT-Cube™など)から高出力でマルチチャンネルのモジュール式19インチラックナノポジショニングシステム(APTラックシステム)まで幅広い種類のモーションコントローラをカバーするKinesisシリーズのデバイスを制御できます。
Kinesisソフトウェアには、最新のC#、Visual Basic、LabVIEW™またはその他の.NETに対応する言語を使用してカスタムプログラムを作成するサードパーティの開発者向けに、.NETコントロールが付属しています。また、.NETフレームワークを使用しない用途向けに低級言語用のDLLライブラリも付いています。センターシーケンスマネージャが、当社の全てのモーションコントロールハードウェアの統合と同期をサポートします。
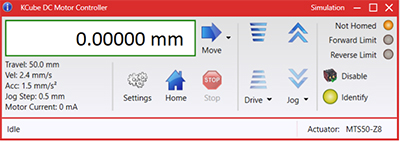
KinesisのGUIスクリーン
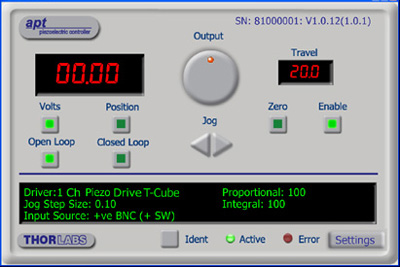
APTのGUIスクリーン
当社従来のAPTシステムソフトウェアプラットフォームは、C#、Visual Basic、LabVIEWまたはその他のActive-Xに対応する言語を使用してカスタムプログラムを作成するサードパーティの開発者向けに、ActiveXをベースとしたコントロールが付属しています。また、ハードウェア無しでカスタムプログラムの開発を行うためのシミュレーターモードも付いています。
これらの共通のソフトウェアプラットフォームにより、あらゆるKinesisとAPTコントローラをシングルアプリケーションに簡単に組み込むことができます。ソフトウェアツールは1セット習得するだけで共通した操作が可能です。シングルチャンネルシステムからマルチチャンネルシステムまで、あらゆるコントローラを組み合わせ、全てを1台のPCのソフトウェアインターフェイスから制御することが実現可能です。
このソフトウェアパッケージを使用するには2つの手段があります。GUI(グラフィカルユーザーインターフェイス)ユーティリティを使用したコントローラとの直接対話ならびに「out of the box」コントロール、またはご選択の開発言語でカスタム統合の位置決めやアライメントソリューションを簡単にプログラムできる一連のプログラミングインターフェイスです。
APTシステムソフトウェアをよりご理解いただけるために様々なチュートリアルビデオもご用意しております。ビデオではソフトウェアの概要とAPT Configユーティリティをご説明しています。また、ソフトウェアのシミュレーターモードを利用すると、コントローラを接続しないでソフトウェアを試すことができます。その方法を説明したビデオもあります。これらのビデオは「APTチュートリアル」タブ内のリンクからご覧いただけます。
ソフトウェア
Kinesis バージョン 1.14.49
このKinesisソフトウェアパッケージには、当社のKinesisならびにAPT™システムコントローラを制御するためのGUIが含まれています。
下記もご用意しております:
- 通信プロトコル
Kinesis®ソフトウェアでは新しい.NETコントロールが使用でき、最新の最新のC#, Visual Basic, LabVIEW™、ほかの.NET対応言語を使用する開発者がカスタムにプログラムを作成することもできます。
C#
このプログラミング言語はマルチプログラミングパラダイムやマルチプログラミング言語が使用可能となるよう設計されているため、複雑な問題が簡単かつ効率的に解決できます。型付け、命令型、宣言型、関数型、ジェネリック、オブジェクト指向、そしてコンポーネント指向が含まれます。 この共通のソフトウェアプラットフォームにより、1セットのソフトウェアツールを習得するだけで、あらゆるKinesisコントローラを簡単に組み合わせることができます。このようにして1軸システムのコントローラから多軸システムのコントローラまで、様々なコントローラを組み合わせ、全てを1台のPCのソフトウェアインターフェイスから制御することが可能となりました。
Kinesisシステムソフトウェアを使用するには2つの手段があります。コントローラを直接つないで制御を行なう付属のGUI(グラフィカルユーザーインターフェイス)ユーティリティ、またはご希望の開発言語でカスタム仕様の位置決めやアライメントを簡単にプログラムできる一連のプログラミングインターフェイスです。
Kinesisモーションコントロールライブラリの構築の参考となる実行可能なプロジェクト機能拡張例については下のリンクをクリックしてください。なお、Quick Startのプロジェクト例の実行には別の統合開発環境(IDE)(Microsoft Visual Studioなど)が必要です。C#のプロジェクト例はKinesisソフトウェアパッケージに付属する.NETコントロールで実行可能です(詳細は「Kinesisソフトウェア」タブをご覧ください)。
 | Click Here for the Kinesis with C# Quick Start Guide Click Here for C# Example Projects Click Here for Quick Start Device Control Examples |  |
LabVIEW
LabVIEWは、.Netコントロールを介してKinesisまたはAPTベースのコントローラとの通信に使用できます。LabVIEWでは、ツールとオブジェクトでフロントパネルとして知られるユーザーインターフェイスを構築した後、グラフィカル表記の関数を使ってコードを追加し、フロントパネルのオブジェクトを制御します。下記のLabVIEWチュートリアルでは.Netコントロールを使用してLabVIEW内KinesisまたはAPT駆動デバイス用の制御GUIを作成するための情報をご提供しています。 LabVIEWでコントローラを制御する基本的な方法や、LabVIEW GUIを用いてデバイスを操作する前に行うべき設定の手順についても解説しています。
 | Click Here to View the LabVIEW Guide Click Here to View the Kinesis with LabVIEW Overview Page |  |
こちらのページでご覧いただくAPTビデオチュートリアルは、付属のATPユーティリティに関する説明と、いくつかのプログラミング環境におけるAPTシステムのプログラミングに関する説明の2つの部分から構成されています。
免責事項:これらの動画は、当初はAdobe Flashによって作成されました。2020年のAdobe Flashのサポート終了後、これらのチュートリアルは再録画されています。各動画の下にはFlash Playerの操作ボタンが見えますが、機能はしません。
APTコントローラには、APTUserユーティリティとAPTConfigユーティリティが付いています。APTUserを用いると、直感的操作が可能なグラフィック制御パネルを介して、APTで制御するハードウェアに素早く簡単に接続することができます。APTConfigは「オフライン」ユーティリティで、メカニカルステージのタイプを事前に選択し、それらを特定のモーションコントローラに対応付けるなど、システム全体のさまざまな設定を行うことができます。
APT Userユーティリティ
下の左側の動画では、APTUserユーティリティの操作概要について説明しています。シングルチャンネルコントローラのOptoDriverは、制御用のPCが無くても前面パネルのコントローラを介して操作できます。前面パネルのコントローラに保存されている操作に関する設定は、APTUserユーティリティを使用して変更することができます。そのプロセスは下の右側の動画でご覧いただけます。
APT Configユーティリティ
シミュレートされたハードウェア構成のセットアップや、メカニカルステージの特定のモータードライブチャンネルへの対応付けなど、APT Configユーティリティを使用してAPTシステム全体の様々な設定ができます。下の最初の動画ではAPT Configの概要をご覧いただけます。シミュレートされたハードウェア構成の作成方法やステージと対応付ける方法についての詳細は、その右側の2つの動画でご覧いただけます。
APTのプログラミング
APTソフトウェアシステムは、ActiveXコントロールのコレクションとして実装されています。ActiveXコントロールは言語に依存しないソフトウェアモジュールで、グラフィカルユーザーインターフェイスとプログラミングインターフェイスの両方を提供します。ハードウェアユニットのタイプごとにActiveXコントロールのタイプがあります。例えば、Motor ActiveXコントロールはすべてのタイプのAPTモーターコントローラ(DCまたはステッパ)の操作に対応します。ActiveXコントロールは多くのWindowsソフトウェア開発環境やソフトウェア言語で直接サポートされており、そのようなコントロールがカスタムアプリケーションに組み込まれると、そこに含まれるすべての機能が即座にアプリケーションで利用できるようになります。下の動画では、LabVIEW、Visual Basic、Visual C++によるAPT ActiveXコントロールの基本的な使用方法について説明しています。これ以外に、LabWindows CVI、C++ Builder、VB.NET、C#.NET、Office VBA、Matlab、HPVEEなどの多数の言語でもActiveXはサポートされています。これらの言語環境についてはチュートリアルのビデオでは特に取り上げていませんが、動画内の考え方の多くは他の言語環境でも適切に使用できます。
Visual Basic
Part 1ではVisual Basicで動作するAPT ActiveXコントロールを設定する方法について説明しており、Part 2では独自の位置決めシーケンスをプログラミングする方法について説明しています。
LabVIEW
LabVIEWはActiveXをフルサポートしています。下の一連のチュートリアルビデオでは、APTによる独自のモーションコントロールシーケンスを作製する際の基本的な構成要素を示しています。まずソフトウェア開発中にオンラインヘルプを呼び出す方法をご紹介します。Part 2ではAPT ActiveXコントロールの作成方法をご紹介します。ActiveXコントロールではメソッド(機能)とプロパティ(数値設定)の両方を設定できます。Part 3と4では、ActiveXコントロールで示されたメソッドとプロパティを作成してワイヤで接続する方法をご紹介します。最後に、Part 5では全体をまとめて、独自の移動シーケンスを実行するLabVIEWのプログラム例をご紹介します。
Part 1:オンラインヘルプへのアクセス方法
Part 2:ActiveXコントロールの作成方法
Part 3:ActiveXのメソッドの作成方法
Part 4:ActiveXのプロパティの作成方法
Part 5:ActiveXコントロールの開始方法
下のチュートリアルビデオでは、メソッドおよびプロパティのノードを作成する別の方法について説明しています。
ActiveXメソッドの作成方法(別の方法)
ActiveXプロパティの作成方法(別の方法)
Visual C++
Part 1ではVisualC++で動作するAPT ActiveXコントロールを設定する方法について説明しており、Part 2では独自の位置決めシーケンスをプログラミングする方法について説明しています。
MATLAB
当社のAPTポジショナにMATLABおよびActiveXコントロールを使用する場合は、こちらの資料をご覧ください。
プログラマー向けとして、LabVIEWでAPTソフトウェアをプログラミングする方法もこちらからご覧いただけます。
| Posted Comments: | |
| No Comments Posted |
 Products Home


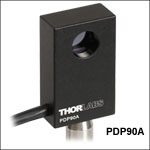
 ズーム
ズーム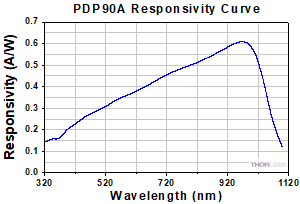 Click to Enlarge
 フォトダイオード位置センシングディテクタ