光学ビームシャッタ
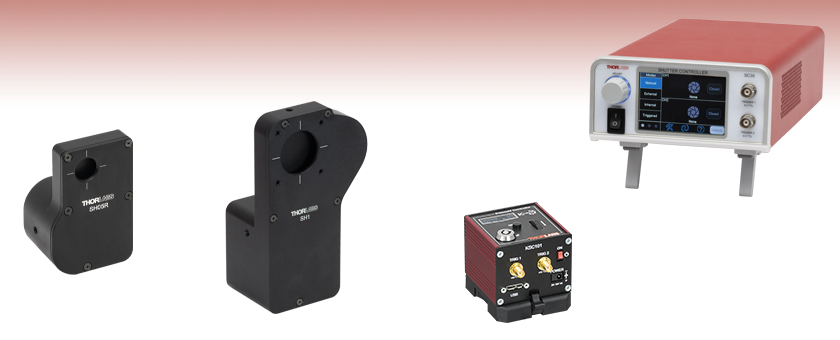
- Ø1/2" and Ø1" Beam Shutters
- Two Controller Options Available
- Interlock Mode Incorporated into Control Logic
SH1
Ø1" Beam Shutter,
10 ms (Typ.) Shutter Close Time
SC30
Benchtop Shutter Controller
KSC101
K-Cube® Compact Shutter Controller
(Compatible with the SH05R(/M) Optical Beam Shutter)
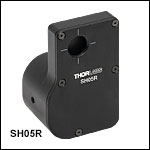
SH05R
Ø1/2" Beam Shutter,
8.0 ms (Typ.) Shutter Close Time

Please Wait
| Shutter Selection Guide | ||
|---|---|---|
| Diaphragm | Single-Blade | Liquid Crystal |
| Ø1/4" Motorized | Ø0.29" Manual | Ø20 mm Liquid Crystal |
| Ø1/2" Motorized | Ø1/2" and Ø1" Motorized | |
| Ø1" Motorized | ||
特長
- Ø12.7 mm(Ø1/2インチ)およびØ25.4 mm(Ø1インチ)のビームシャッタ
- シャッタが閉じるまでの時間(典型値):
- SH05R/MをコントローラKSC101で駆動した場合:8.0 ms(開口が90%から10%まで閉じる時間)
- SH1/MをコントローラSC30で駆動した場合:10 ms(開口が80%から20%まで閉じる時間)
- レーザの安全対策用に適したノーマルクローズ型
- Ø12 mm~Ø12.7 mm(Ø1/2インチ)ポスト取付け用のM4タップ穴
- 別売りでベンチトップ型コントローラSC30または小型コントローラKSC101(SH05R/Mにのみ対応)をご用意(下記参照)
光学シャッタは、回転式電動アクチュエータによりミリ秒レベルのシャッタ動作を行ないます。通常はシャッタは閉じた状態にあり、外部のコントローラからパルス制御信号が入力されると開きます。シャッタへの制御電圧がHighの間はシャッタは開いていますが、電圧がLowになると即座にシャッタは閉じるため、fail-safe動作になっています。シャッタを開閉する周波数は調整することができます。光センサで筺体内のシャッターブレードの位置が検出されるため、シャッタの位置情報を得ることができます。この機能により、レーザ安全用のロックアウト機能を必要とする用途に適しています。
シャッタの寿命を長くするために、開口部をレーザービームの焦点近辺には配置しないようにしてください。なお、ケースの温度が50 °Cを超えるとソレノイドの性能は保証されません。開口部を閉状態にしてハイパワーのレーザ光を長時間シャッタに入射していると、著しく熱を蓄積してしまいます。
コントローラ
当社では光学シャッタ用のコントローラとして、SC30とKSC101の2種類をご用意しています。SC30は下記のØ12.7 mm(Ø1/2インチ)とØ25.4 mm(Ø1インチ)シャッタや当社のØ6.4 mm、Ø12.7 mm(Ø1/2インチ)、Ø25.4 mm(Ø1インチ)SHB シリーズシャッタにもご使用いただけますが、KSC101はØ12.7 mm(Ø1/2インチ)のシャッタにのみ対応します。制御に必要な要求仕様の詳細については「仕様」タブをご参照ください。どちらのコントローラにも「インターロックモード」機能が組み込まれており、キーロッまたは 2.5 mmモノフォノジャックほか、手動、トリガ、またはソフトウェア制御による操作モードが備わっています。ベンチトップ型コントローラSC30はUSB 2.0接続により、付属のスタンドアローン型ソフトウェアGUIでPC操作が可能です。KSC101は小型のK-Cube®コントローラでUSB3.0(2.0にも対応)接続です。当社のKinesisソフトウェアパッケージを使用して制御します。2つのコントローラの比較については「仕様」タブ内の表をご覧ください。
6-way HRSコネクタの付いた長さ3 mのケーブルが付属しており、これでシャッタとシャッターコントローラSC30またはKSC101とを接続します。また、交換用のケーブルも別途ご用意しております(下記参照)。
| Controller Specifications | |||
|---|---|---|---|
| Item # | SC30 | KSC101 | |
| Maximum Exposure Ratea | 50 Hz | 20 Hz | |
| Minimum Exposure Timeb | 10 ms | 15 ms | |
| Typical Transfer Time | 1 ms | 1.5 ms | |
| Accuracy | 0.2 ms | 0.3 ms (at 15 ms Exposure) | |
| On/Off Timesb,c | 1 ms to 1000 s | 10 ms to 1000 s | |
| Maximum Steady State Power | 8 W per Output | 3.5 W | |
| Average Hold Voltage Range | 9.1 to 10.1 V PWM, SHx Series Shutters 1.3 to 1.5 V PWM, SHBx Series Shutters | 6.5 to 7.5 V PWM | |
| Trigger Input/Output | TTL | TTL | |
| Voltage Output | 24 V Pulse, SHx Series Shutters 7 V Pulse, SHBx Series Shutters | 15 V Pulse | |
| Output Enable | Touchscreen Button and 2.5 mm Interlock Jack Plug | Key Switch and 3.5 mm Interlock Jack Plug | |
| Position Feedback Sensor | - | Photodiode | |
| Operating Modes | |||
| Manual | User Controlled On/Off | ||
| Single | Trigger Controlled Single On/Off Cycles | DSP Controlled Single On/Cycles | |
| Auto | Trigger Controlled Multiple On/Off Cycles | DSP Controlled Multiple On/Off Cycles | |
| X-Gate (Triggered) | Shutter Controlled by BNC Input Trigger | Externally Triggered On/Off | |
| Trigger INd | BNC, TTL, Low: 0.5 V max High: 2.0 - 5.0 V | SMA, TTL, Type 5 V | |
| Trigger OUTd | BNC, TTL, 5 V (Typical) | SMA, TTL, Type 5 V | |
| Input Power Requirements | |||
| Voltage | 100 - 240 VAC U.S. Power Cord Included | 15 V Regulated DC | |
| Current | - | 1 A Peak, 300 mA Steady State | |
| General | |||
| Instrument Weight | 1.5 kg lbs (3.35 lbs) | 160 g (5.5 oz) | |
| Housing Dimensions (W x D x H) | 12.79" x 6.03" x 3.38" (324.9 mm x 153.2 mm x 85.8 mm) | 60.0 x 60.0 x 49.2 mm (2.36 " x 2.36 " x 1.94")e | |
| Beam Shutter Specifications | ||
|---|---|---|
| Item # | SH05R(/M) | SH1(/M) |
| Aperture | Ø1/2" (12.7 mm) | Ø1.0" (25.4 mm) |
| Blade Material | 6061-T6 Aluminum | |
| Blade Thickness | 0.063" (1.6 mm) | 0.06" (1.6 mm) |
| Solenoid Coil Resistance | 28 Ω | 31.84 Ω |
| Initial State | Closed | |
| Operation | ||
| Actuation Pulse | 8 V to 50 V (Time Dependent) | 10 V to 75 V (Time Dependent) |
| Holding Voltage | 8 V to 12 V | 8 V to 15 V |
| Maximum Recommended Applied Solenoid Voltagea | < 12 VDC (Holding) < 50 VDC (Pulse) | 15 VDC (Holding) 75 VDC (Pulse) |
| Maximum Pulse Rate | 10 Hz Steady, 25 Hz Burst | 12.5 Hz Steady, 16.6 Hz Burst |
| Duty Cycleb | Optimum @ 10 Hz = 40% | Optimum @ 8 Hz = 50% |
| Lifetime | 1,000,000 Cycles (Typical) | |
| Max Solenoid Power (20°C) | ||
| Steady State | 4 W @ Continuous | 9 W @ Continuous |
| 50% Duty Cycle | 8 W @ 100 s | 18 W @ 100 s |
| 25% Duty Cycle | 16 W @ 36 s | 36 W @ 36 s |
| 5% Duty Cycle | 80 W @ 2.5 s | 180 W @ 2.8 s |
 Click to Enlarge
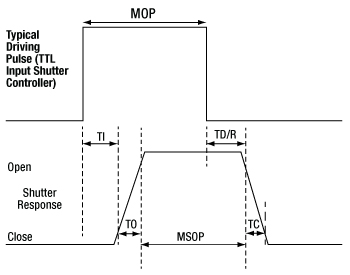
Figure 2.1 シャッタ応答のダイヤグラム
| Timing Specifications | |||
|---|---|---|---|
| Controller | Eventa | SH05R(/M)b | SH1(/M) |
| SC30 | TI | 8.0 ms | 10 ms |
| TO | 4.3 ms | 10 ms | |
| TD/R | 11.0 ms | 20 ms | |
| TC | 6.5 ms | 10 ms | |
| MOP | 10 ms | 40 ms | |
| MSOP | 14 ms | 40 ms | |
| KSC101 | TI | 11 ms | N/Ac |
| TO | 5.5 ms | ||
| TD/R | 26 ms | ||
| TC | 8.0 ms | ||
| MOP | 19 ms | ||
| MSOP | 24 ms | ||
| Table 2.2 Timing Diagram Definitions | ||
|---|---|---|
| Event | SH05R(/M) | SH1(/M) |
| TI | Time Initialize: Time from Initialization pulse, to energizing of coil, to the initial movement of the shutter. | Transfer Initialize: the time delay between the application of the energizing voltage and the initial movement of the shutter. |
| TO | Time Open (Rise): Time of shutter blade movement to open from 10% exposurea to 90% exposure. | Transfer Open: the time for the shutter to move from 20% exposurea to 80% exposure. |
| TD/R | Time Delay Release: Time delay of release of the hold voltage or pulse at the moment the shutter blade starts to close. | Transfer Dwell/Release: the delay between the removal of the energizing voltage and the initial closing movement of the shutter. |
| TC | Time Close (Fall): Time of shutter blade movement to close from a 90% exposurea to 10% exposure. | Transfer Close: the time for the shutter to move from 80% exposurea to 20% exposure. |
| MOP | Minimum Open Pulse: Minimum pulse width as driven with the SC30 or KSC101 controller. | Minimum Open Pulse: the minimum pulse width supplied by the SC30 controller. |
| MSOP | Minimum Shutter Open Pulse: Minimum shutter open time (pulse) using the MOP time from the SC30 or KSC101 controller. | Minimum Shutter Open Time: the minimum time the shutter will remain open when using the minimum open pulse (MOP) from the SC30 controller. |
SH05R(/M)のインターフェイスコネクタ
HR10-7R-6S
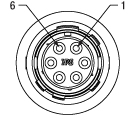
| Pin | Description |
|---|---|
| 1 | Vsupply: 3.3 - 5 V, 20 mA |
| 2 | Solenoid |
| 3 | Solenoid |
| 4 | GND |
| 5 | GND |
| 6 | Sense Return Low: 0.11 V High: Vsupply - 0.11 V |
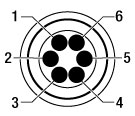
SH1(/M)のインターフェイスコネクタ
HR10-7R-6S

| Pin | Description |
|---|---|
| 1 | Monitor Opto Anode +V |
| 2 | Solenoid +V |
| 3 | Solenoid GND |
| 4 | Monitor Opto Cathode GND |
| 5 | Monitor Opto Emitter GND |
| 6 | Monitor Opto Collector +V |
SC30のピン配列
SHシリーズインターフェイスコネクタ
HR10-7R-6S
| Pin | Description |
|---|---|
| 1 | To Opto Anode (12 V limited to 20 mA) |
| 2 | To Shutter Coil - 24 V Pulse - 10 V Steady State (0.4 A max) |
| 3 | To Shutter Coil - GND (on) - Open Circuit (off) |
| 4 | To Opto Cathode - GND |
| 5 | To Opto Emitter - GND |
| 6 | To Opto Collector (2.5V) |
SHBシリーズインターフェイスコネクタ
4ピン Mini-DIN
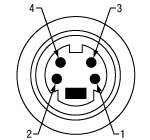
| Pin | Description |
|---|---|
| 1 | Shutter Detect |
| 2 | Modulation + |
| 3 | +5 VDC |
| 4 | Modulation - |
| SHIELD | GND |
KSC101のピン配列
ソレノイド接続用コネクタ
Hiroseメス型
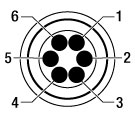
| Pin | Description |
|---|---|
| 1 | Opto Anode (12 V limited to 20 mA) |
| 2 | Shutter Coil 15 V Pulse, 10 V steady state (0.4 A max) |
| 3 | Shutter Coil Ground (When ON) Open CCT (When OFF) |
| 4 | Opto Cathode Ground |
| 5 | Opto Emitter Ground |
| 6 | Opto Collector (2.5 V) |
PC接続用コネクタ*

*このUSB3.0のポートにはUSB2.0のMicro-Bタイプコネクタを接続することもできます。その場合は上図の網掛け部分に接続します。KSC101にはAタイプ-MicroBタイプのUSB 3.0ケーブルが1本付属します。
TRIG 1 | TRIG 2 |
 |  |
| +5 V TTL | +5 V TTL |
| これらのコネクタでは5 Vロジックレベルの入出力を行いますが、外部機器と適切にトリガ信号の入出力ができるように構成することができます。 ロジックレベルの調整や、トリガ信号の入力/出力の設定は、それぞれのポートごとに独立に行うことが可能です。 | |
インターロック用 | |
 | |
| ユニットを動作可能にするには、こちらのコネクタの端子を短絡させる必要があります。対応するインターロック用のプラグがユニットに付属しています。また、スイッチを接続したカスタム仕様の3.5 mmプラグを用いて、外部からこの接点を制御することも可能です。その場合も、ユニットを動作させるにはスイッチを閉にする必要があります。 | |
SC30シャッターコントローラ用ソフトウェア

Figure 4.1 SC30ソフトウェアGUI画面
ベンチトップ型シャッタ用コントローラSC30の操作用SC30ソフトウェアには、GUI、ドライバ、2次開発用のLabVIEW™/C++ SDKが含まれています。ソフトウェアは、コントローラSC30に接続されたSHおよびSHBシリーズシャッターの開閉シーケンスのタイミングを制御するために使用できます。
このソフトウェアでは.NETコントロールを使用できるため、最新のC#、Visual Basic、LabVIEW™、あるいはその他の.NET対応言語を使用してカスタムプログラムを作成することができます。.NETフレームワークの使用を想定していないアプリケーションのために、ローレベルのDLLライブラリも含まれています。また、APIは各インストールに含まれています。
注: Kinesisソフトウェアは、K-Cube小型シャッタ用コントローラKSC101の制御にお使いいただけますが、ベンチトップ型シャッターコントローラSC30には対応しておりません。
ソフトウェア
Kinesisバージョン1.14.56
このKinesisソフトウェアパッケージには、当社のKinesisシステムコントローラを制御するためのGUIが含まれています。
下記もご用意しております。
- ファームウェア更新ユーティリティ
- 通信プロトコル
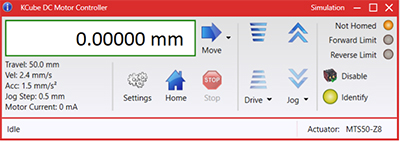
Figure 58A KinesisソフトウェアのGUI画面
当社のKinesisソフトウェアパッケージを用いて、当社の様々なモーションコントローラを駆動することができます。このソフトウェアは小型で低出力のシングルチャンネルドライバ(K-Cube®など)から、高出力でマルチチャンネルのベンチトップ型ユニットやモジュール型の19インチラックナノポジショニングシステム(ラックシステムMMR60x)まで、当社Kinesisシリーズの様々なモーションコントローラの制御用にご使用いただけます。
Kinesisソフトウェアでは.NETコントロールを使用できるため、最新のC#、Visual Basic、LabVIEW™、あるいはその他の.NET対応言語を使用してカスタムプログラムを作成することができます。.NETフレームワークやAPIの使用を想定していないアプリケーションのために、ローレベルのDLLライブラリも含まれています。中央シーケンスマネージャ(Central Sequence Manager)は、当社のすべてのモーションコントロール用ハードウェアの統合と同期の機能をサポートしています。
この共通のソフトウェアプラットフォームにより、ユーザは単一のソフトウェアツールを習得するだけで、あらゆるモーションコントロールデバイスを1つのアプリケーション内で組み合わせて使用することができます。このように1軸システム用から多軸システム用までのあらゆるコントローラを組み合わせ、それら全てを1台のPCの統合されたソフトウェアインターフェイスから制御できます。
このソフトウェアパッケージには2つの使い方があります。1つはGUI(グラフィカルユーザーインターフェイス)ユーティリティを用いる方法で、コントローラの到着後すぐに直接的な操作と制御を行なうことができます。もう1つは一連のプログラミングインターフェイスを用いる方法で、ご希望の開発言語によりカスタム仕様の位置決めやアライメント用のプログラムを簡単に作成することができます。
レーザの安全性とクラス分類
レーザを取り扱う際には、安全に関わる器具や装置を適切に取扱い、使用することが重要です。ヒトの目は損傷しやすく、レーザ光のパワーレベルが非常に低い場合でも障害を引き起こします。当社では豊富な種類の安全に関わるアクセサリをご提供しており、そのような事故や負傷のリスクの低減にお使いいただけます。可視域から近赤外域のスペクトルでのレーザ発光がヒトの網膜に損傷を与えうるリスクは極めて高くなります。これはその帯域の光が目の角膜やレンズを透過し、レンズがレーザーエネルギを、網膜上に集束してしまうことがあるためです。
安全な作業および安全に関わるアクセサリ
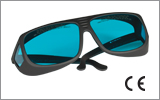
- クラス3または4のレーザを取り扱う場合は、必ずレーザ用保護メガネを装着してください。
- 当社では、レーザのクラスにかかわらず、安全上無視できないパワーレベルのレーザ光線を取り扱う場合は、ネジ回しなどの金属製の器具が偶然に光の方向を変えて再び目に入ってしまうこともあるので、レーザ用保護メガネを必ずご使用いただくようにお勧めしております。
- 特定の波長に対応するように設計されたレーザ保護眼鏡は、装着者を想定外のレーザ反射から保護するために、レーザ装置付近では常に装着してください。
- レーザ保護眼鏡には、保護機能が有効な波長範囲およびその帯域での最小光学濃度が刻印されています。
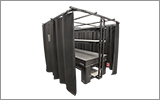
- レーザ保護カーテンやレーザー安全保護用布は実験室内での高エネルギーレーザの遮光にご使用いただけます。
- 遮光用マテリアルは、直接光と反射光の両方を実験装置の領域に封じ込めて外に逃しません。
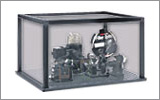
- 当社の筺体システムは、その内部に光学セットアップを収納し、レーザ光を封じ込めて危険性を最小限に抑えます。
- ピグテール付き半導体レーザは、他のファイバに接続、もしくは他のファイバとの接続を外す際には、レーザ出力をOFFにしてください。パワーレベルが10 mW以上の場合には特にご注意ください。
- いかなるビーム光も、テーブルの範囲で終端させる必要があります。また、レーザ使用中には、研究室の扉は必ず閉じていなければなりません。
- レーザ光の高さは、目線の高さに設定しないでください。
- 実験は光学テーブル上で、全てのレーザービームが水平を保って直進するように設定してください。
- ビーム光路の近くで作業する人は、光を反射する不要な装飾品やアクセサリ(指輪、時計など)をはずしてください。
- レンズや他の光学装置が、入射光の一部を、前面や背面で反射する場合がありますのでご注意ください。
- あらゆる作業において、レーザは必要最小限のパワーで動作するようにご留意ください。
- アライメントは、可能な限りレーザの出力パワーを低減して作業を行ってください。
- ビームパワーを抑えるためにビームシャッタや フィルタをお使いください。
- レーザのセットアップの近くや実験室には、適切なレーザ標識やラベルを掲示してください。
- クラス3Rやクラス4のレーザ(安全確保用のインターロックが必要となるレーザーレベルの場合)で作業する場合は、警告灯をご用意ください。
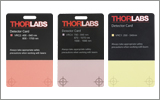
- ビームトラップの代用品としてレーザービュワーカードを使用したりしないでください。
レーザ製品のクラス分け
レーザ製品は、目などの損傷を引き起こす可能性に基づいてクラス分けされています。国際電気標準会議(The International Electrotechnical Commission 「IEC」)は、電気、電子工学技術関連分野の国際規格の策定および普及を行う国際機関で、IEC60825-1は、レーザ製品の安全性を規定するIEC規格です。レーザ製品のクラス分けは下記の通りです
| Class | Description | Warning Label |
|---|---|---|
| 1 | ビーム内観察用の光学機器の使用を含む、通常の条件下での使用において、安全とみなされているクラス。このクラスのレーザ製品は、通常の使用範囲内では、人体被害を及ぼすエネルギーレベルのレーザを発光することがないので、最大許容露光量(MPE)を超えることはありません。このクラス1のレーザ製品には、筐体等を開かない限り、作業者がレーザに露光することがないような、完全に囲われた高出力レーザも含まれます。 |  |
| 1M | クラス1Mのレーザは、安全であるが、望遠鏡や顕微鏡と併用した場合は危険な製品になり得ます。この分類に入る製品からのレーザ光は、直径の大きな光や拡散光を発光し、ビーム径を小さくするために光を集束する光学素子やイメージング用の光学素子を使わない限り、通常はMPEを超えることはありません。しかし、光を再び集光した場合は被害が増大する可能性があるので、このクラスの製品であっても、別の分類となる場合があります。 |  |
| 2 | クラス2のレーザ製品は、その出力が最大1 mWの可視域での連続放射光に限定されます。瞬目反射によって露光が0.25秒までに制限されるので、安全と判断されるクラスです。このクラスの光は、可視域(400~700 nm)に限定されます。 |  |
| 2M | このクラスのレーザ製品のビーム光は、瞬目反射があるので、光学機器を通して見ない限り安全であると分類されています。このクラスは、レーザ光の半径が大きい場合や拡散光にも適用されます。 |  |
| 3R | クラス3Rのレーザ製品は、直接および鏡面反射の観察条件下で危険な可視光および不可視光を発生します。特にレンズ等の光学機器を使用しているときにビームを直接見ると、目が損傷を受ける可能性があります。ビーム内観察が行われなければ、このクラスのレーザ製品は安全とみなされます。このクラスでは、MPE値を超える場合がありますが、被害のリスクレベルが低いクラスです。可視域の連続光のレーザの出力パワーは、このレベルでは5 mWまでとされています。 |  |
| 3B | クラス3Bのレーザは、直接ビームを見た場合に危険なクラスです。拡散反射は通常は有害になることはありませんが、高出力のクラス3Bレーザを使用した場合、有害となる場合もあります。このクラスで装置を安全に操作するには、ビームを直接見る可能性のあるときにレーザ保護眼鏡を装着してください。このクラスのレーザ機器にはキースイッチと安全保護装置を設け、さらにレーザ安全表示を使用し、安全照明がONにならない限りレーザがONにならないようにすることが求められます。Class 3Bの上限に近いパワーを出力するレーザ製品は、やけどを引き起こすおそれもあります。 |  |
| 4 | このクラスのレーザは、皮膚と目の両方に損傷を与える場合があり、これは拡散反射光でも起こりうるとみなされています。このような被害は、ビームが間接的に当たった場合や非鏡面反射でも起こることがあり、艶消し面での反射でも発生することがあります。このレベルのレーザ機器は細心の注意を持って扱われる必要があります。さらに、可燃性の材質を発火させることもあるので、火災のリスクもあるレーザであるとみなされています。クラス4のレーザには、キースイッチと安全保護装置が必要です。 |  |
| 全てのクラス2以上のレーザ機器には、上記が規定する標識以外に、この三角の警告標識が表示されていなければいけません。 |  | |
| Posted Comments: | |
Malik Hassan
(posted 2025-06-26 16:04:56.267) Hello do you have any template LabView files to control the motorized Iris? Thank you!! ksosnowski
(posted 2025-07-03 12:48:00.0) Hello Malik, and thanks for reaching out to us. We will be adding Labview examples in the future for the SC30 software. I have reached out directly to discuss your application further. Benoit Rufflé
(posted 2025-06-26 09:58:42.213) Hi, how to control the SC30 from Matlab 64b running on a PC with W10 64b ? Is there an ActiveX module or something similar ? Regards ksosnowski
(posted 2025-07-01 03:16:32.0) Hello Benoit, and thanks for reaching out to us. We provide a C++ SDK for the SC30 controller which can potentially be used in Matlab. The C++ examples included with our software can give you an idea of the methodology used. Some previous Matlab examples on our Github, for example from our CCS Spectrometers, may be useful as a general guide. The SC30 is not a VISA device like the CCS, however this is our closest reference currently for Matlab compatibility on this controller. At this time we do not have any ActiveX modules for this however. I have reached out directly to discuss your application in further detail. Stefano Lettieri
(posted 2024-12-04 19:20:32.757) Dear Sirs/Madams,
Maybe you will want to contact me directly, but I'll try to be as short as possible here. I purchased a SC10 around year 2010 or 2011 together with a shutter SH-05R/M. Since then, I used it as part of a multi-instrument system controlled via home-built routines of LabView running on a very old PC (let us call it PC1, running with windows XP).
Recently, I tested this same SC10 controller on a new PC (“PC2”), using Windows 11, using the updated software package (version 1.3.0). As I still had to maintain the compatibility of the SC10 with the old PC1-controlled system, I did not install the new firmware (version 1.07), which was released to address compatibility issues with our SH1 Shutter. As I am not using the SH1 shutter, I assumed that the new firmware was not needed to use the old version SH-05.
Running the software GUI, the result was “no instrument found” (no communication). Of course, the COM port settings were correct, and I verified that the cables and the serial-to-usb connector are working properly.
Hence, my questions are:
1) Can the SL10 + SH05/M system be controlled on Windows 11 with the original (i.e. version 1.0) firmware?
2) If I install the new firmware (1.07) for the SC10, shall still be possible to operate it with a old Windows XP (PC1), which employs the old GUI software (version 1.0) and related LabView routines?
Best regards ksosnowski
(posted 2024-12-09 03:58:17.0) Hello Stefano, thank you for reaching out to us. In order to use the updated SC10 software version on Windows 11, you must also use the updated firmware. Unfortunately, the newer firmware may not work with the original SDK or drivers. However the SC10 manual section 4.4 includes serial commands which can be used to communicate with the controller regardless of the host operating system or firmware. I have reached out directly to discuss your application in further detail. Takeo Ejima
(posted 2024-05-28 08:49:46.273) いつもお世話になっております。
東北大の江島です。
早速ですが、SC10を用いた制御プログラムを開発中ですが、RS232Cの通信がうまくできません。こちらで調べたところ、送信はUTF-8を受付けて、受信はISO-8859-1とするとうまく通信できるようです。
通常、送受信の文字コードは一致しているのが普通ですので、かなり疑問に思っています。
お手数ですが、SC10で使用している文字コードをお教え願えないでしょうか?
取り急ぎ
江島 ksosnowski
(posted 2024-06-07 02:21:08.0) Hello Takeo, thanks for reaching out to us. We use UTF-8 when communcating with SC10, as can be seen in the Python examples included with the SC10 software installation folder. A member from your local tech support team has reached out to discuss this further. Alejandro Martinez Jimenez
(posted 2024-03-04 16:27:45.963) Hi,
I'm looking for an optical shutter that can be triggered with just a TTL signal. Do I need to buy the controller SC10 or KSC101 in this case? Or can I instead just send the signal to the SH05R(/M) Interface Connector PIN 6 for opening and closing? I understand that for further programming it will be beneficial to use SC10, but in the most basic case, would this be possible?
Best ksosnowski
(posted 2024-03-06 12:04:10.0) Hello Alejandro, thanks for reaching out to Thorlabs. Our shutters require a driving controller with sufficient current output to power the solenoid coil inside the device. Typical function generators will not be able to provide this type of power to an inductive load like a solenoid. Our controllers additionally provide a higher voltage opening signal to overcome any friction and inductance in the system then drop to a lower holding voltage to keep the shutter open against the internal return spring. The lower holding voltage helps prevent unnecessary heating and a lack of driving power can result in poor open-timing performance or potentially a failure to open at all. For a TTL input on SH05R(/M) it is recommended to use either our KSC101, or SC10 which has slightly better timing due to higher power output. Sergii bashchenko
(posted 2023-11-30 17:27:56.913) Hello,
I can't realize outer triggering mode by putting a few sec TTL pulse onto "IN1",
what is wrong?
Thanks, ksosnowski
(posted 2023-12-05 05:30:05.0) Thanks for reaching out to Thorlabs. I would recommend to start by making sure the device is set to external trigger mode and if using controller KSC101 then the KSC's top panel wheel must be moved down after startup to enable the controller. For troubleshooting questions like this, it is best to reach us directly at techsupport@thorlabs.com. A member from your local tech support team has reached out directly to discuss your issues in further detail. Dana Dlott
(posted 2023-10-17 09:43:39.043) What is the damage threshold for this shutter? I have a low repetition rate high energy 30 ns pulse laser and the pulse fluence is about 5 J/cm2. ksosnowski
(posted 2023-10-17 10:46:26.0) Hello Dana, thanks for reaching out to Thorlabs. While we have not formally tested the damage threshold for these shutters, some customers have reported damage close to energy density of 1J/cm2. Unfortunately in your case the shutter may not be suitable due to the high peak power of the pulses. I have reached out directly to discuss your application in further detail. Shuo Li
(posted 2023-08-16 10:09:53.383) Excuse me! I want to control the light shutter switch by using LABVIEW control KSC101. Do I need to add a sawtooth signal generator to the labview program? da ksosnowski
(posted 2023-08-18 10:42:17.0) Hello Shuo, thanks for reaching out to Thorlabs. With our Kinesis Motion Control Software, we include LabVIEW drivers to interface with the KSC101 directly over USB, without an external function generator signal. This allows the PC to communicate directly with the control board inside KSC101. We also have a KSC101 example in LabVIEW 2011 which I have reached out directly to share. We are working on adding more of these examples to Thorlabs' Github page. If you want to control the shutter state with a TTL signal, KSC101 also has a 5V TTL Trigger port you can use to apply a digital high/lo command. Many DAQs can provide such a signal and be configured in LabVIEW for automation. Frank Jin
(posted 2023-07-13 08:24:25.187) Hi, ksosnowski
I am using SC10, which works good as expected. I did find a SW bug. When I have a lot of serial ports ( like more than 10), the COM list goes to COM10, COM11, ... COM20 etc. The SC10 failed to populate the COM ports, and just closed itself without any error message. Basically the SW can't initiate itself, and fail to open it. I wish this will be a quick and easy fix. If you have a new version, I am more than to test it out. Thanks. cdolbashian
(posted 2023-08-04 11:06:41.0) Thank you for reaching out to us with this bug-find! Since you have reported this, we have provided you with a temporary fix immediately. In the meantime we are working to implement the same fix into the released software. Constant Schouder
(posted 2023-06-05 08:52:45.223) Hello,
I am using a KSC101 to control an optical shutter SH1M. I would like to give commands using a Python program. Would you have a library associated to it that I could use or some recommendations on how to properly start?
Thanks! ksosnowski
(posted 2023-06-12 04:27:02.0) Hello Constant, thanks for reaching out to Thorlabs. SH1(/M) shutters have a larger solenoid and are only intended for use on our SC10 controller which can provide proper power to actuate the shutter in time. SH05R(/M) does have a profile for operating KSC101 in our Kinesis software, however SH1 does not as it is meant for SC10. The Thorlabs GitHub has some examples for Kinesis in Python, including one for KSC101 using Pythonnet: https://github.com/Thorlabs/Motion_Control_Examples/tree/main/Python/KCube/KSC101 user
(posted 2023-04-12 16:09:50.817) Hi, I need two shutters operating simultaneously. Could I trigger both of them with a single SC10 unit using a T connector or would I require one SC10 per shutter? ksosnowski
(posted 2023-04-12 12:28:10.0) Thanks for reaching out to Thorlabs. The Shutter controllers SC10 and KSC101 are only intended to drive a single solenoid shutter. They do not have enough power to drive multiple shutters, and this could overload the controller. It is otherwise fine to use T connectors on the trigger input line to share one signal source to multiple controllers. Julia Sudyka
(posted 2022-12-19 09:04:41.133) Hello,what are the ambient temperature (operation and storage) limits for these shutters? cdolbashian
(posted 2023-01-10 03:26:28.0) Thank you for reaching out to us. We have not tested these parts for temperature extrema, as we intend for them to be operated at STP. I have contacted you directly to discuss your application and compatibility therein. Sonia Buckley
(posted 2022-12-02 06:21:37.397) This should be usb compatible- why do I need to buy another expensive and large piece of equipment to drive it? It was also unclear which equipment to buy to drive it. ksosnowski
(posted 2023-01-12 11:48:54.0) Thanks for reaching out to Thorlabs. Most PCs are not able to supply the proper driving conditions via USB alone. For the 1/2" shutter you can use the KSC101 KCube controller, and both 1/2" and 1" shutters will work with our SC10 Benchtop controller. Both of these controllers can connect to PC for control with our software, though the SC10 controller sources power directly from the wall, and KSC101 uses the KPS201 power supply. KSC101 is a fairly compact controller, however the SC10 allows for faster shutter timing performance. The SC10 ships with the cables needed for power and RS232 connection via DB9 plug, and KSC101 comes with the USB cable for connection. Some third-parties make DB9 serial to USB conversion cables which may work with SC10. I have reached out directly to discuss your application further. user
(posted 2022-07-27 17:20:21.037) We have ordered an SH1/M and will use it intra-cavity to prevent lasing in a production laser that will run continuously for several days at a time, using a hold voltage of 12V supplied by our own controller. I read fault reports below of shutters getting stuck half-way. Has this issue been investigated? Are there conditions/solenoid voltages to avoid in order to prevent this error? ksosnowski
(posted 2022-12-02 04:03:28.0) Thanks for reaching out to Thorlabs. This is a very rare occurrence that, if present from handling damage, would be apparent on arrival of the unit . Only in extreme case of misuse have we seen this happen in operation due to severe overheating. The SH1 and SH05R (and /M units) have a return spring to force the shutter closed in case of loss of power, and an optical monitor to observe if the shutter is open while operating. We recommend to remain within the Max Solenoid Voltages and Max Pulse Rate listed on the specifications for each shutter to avoid overheating. Increased heat will lead to shorter lifetime of the solenoid coil opening the shutter. I have reached out directly to discuss this application further. Chaman Gupta
(posted 2022-07-02 02:24:11.74) Is the SC10 controller compulsorily needed to control the SH1 or can it be connected and just controlled with a computer or some other form of remote? ksosnowski
(posted 2022-07-06 12:41:16.0) The controller will need to provide the driving power to the solenoid inside the SH1 to actuate and hold the shutter open as well as drive the optical emitter and sensor used to monitor the shutter state. We recommend the SC10, which acts as the power supply to the shutter head, and as the signal source. A PC alone cannot generally produce the proper driving power for the shutter, and our SC10 software is designed to work with our controller. The SH1 is compatible with 3rd party controllers however as long as they can provide the proper power to the device. Aaron Riede
(posted 2022-05-17 12:18:33.993) Dear Thorlabs, I want to run the TSC001 together with the SH05 shutter with a Python program. Do you have an example code for that?
Thanks and best regards,
Aaron ksosnowski
(posted 2022-05-23 03:08:34.0) While we don't have any Python examples for this specific TCube driver, we do have some examples for our other KCubes and with the Kinesis C API (installs by default) you can use these as a basis with the correct methods for your controller. I have contacted you directly to discuss this application further. CHANDRASEKHAR MUTYALA
(posted 2022-02-01 04:51:11.04) We would like to know whether the shutter is suitable for femtosecond lasers. If so, then mentioning damage threshold will be appreciable ksosnowski
(posted 2022-02-15 05:35:55.0) Thanks for reaching out to us Chandrasekhar, while we have not tested these shutters for ultrafast pulses, we have had cases where customers use these with some fs pulses without damage. If you are able to share the specifications of your laser, I can research with our team whether the shutter would be suitable for your laser. user
(posted 2021-09-21 12:26:33.253) Dear. The SC10 software crashes when I try to connect to the Shutter Controller. I already tried in 2 different computers and the problem persists. Can you advise what I can do to avoid that? Is there any log I can check what is going on? cdolbashian
(posted 2021-10-15 04:34:07.0) Thank you for reaching out to us at Thorlabs! When interfacing via the software, the most important first step is to ensure that the software and firmware versions are up to date. Please find the most recent version here: https://www.thorlabs.com/software_pages/viewsoftwarepage.cfm?code=SC10
I have reached out to you directly to engage in further troubleshooting steps. Shi-Yuan MA
(posted 2021-08-16 12:07:21.56) Hello,
I'm using a KSC101 to control the optical shutter SH05. The KSC101 is controlled via USB by the Kinesis software on a laptop. In the Kinesis interface, it shows that "Key Enabled" and "Is Ready", but the shutter has no responds when I click to start with a proper configuration and the "Active" is also green. How can I troubleshoot it? The shutter is only connected to KSC101 with the cable that came with it (I didn't see any other ports). cdolbashian
(posted 2021-08-27 09:12:08.0) Thank you for reaching out to us here at Thorlabs! Following our discussions via direct communication, it seems like you had not connected the interlock key, as outlined in sections 4.5.1 and 3.4.2 of the manual. Scott Beattie
(posted 2021-08-06 12:28:46.303) Would the KSC101 and SH1 work together if you only used manual mode? cdolbashian
(posted 2021-08-19 03:46:45.0) Thank you for reaching out to us with your inquiry! Based on previous customer experience, it seems like it is technically possible to do this. However, the performance is not guaranteed in any capacity. We really recommend using the SC10 to achieve the advertised and guaranteed performance! user
(posted 2021-07-21 03:33:35.713) Hello, by partial opening from previous post I meant its faulty behavior, and not partial opening by design. Is it possible that the shutter, due to some defect, gets partially open/closed? If yes, how likely it is? YLohia
(posted 2021-08-03 02:55:44.0) The default position of the electronic system is 'closed' so the shutter closes in case of electrical failure. We have received a few reports from other customers where mechanical failures led to the diaphragm shutters being stuck in half open/closed positions, but with the shutters on the page above we have only seen this occur in extreme case of misuse. We have reached out to you to discuss this further directly. user
(posted 2021-07-14 08:52:30.827) Is it possible that the shutter blade opens/closes only partially? YLohia
(posted 2021-07-15 11:03:21.0) Hello, thank you for contacting Thorlabs. Unfortunately, these shutters can only be in fully open or fully closed states. Susan Parker
(posted 2021-03-12 07:46:25.327) Can you tell me the expected lifetime in number of shutter operations.
In our case we are using it at 1 Hz.
Many thanks.
Best,
Susan. asundararaj
(posted 2021-03-12 10:01:08.0) Thank you for contacting Thorlabs. We spec the typical lifetime of the shutter as 1,000,000 open/close Cycles. Thomas Legbandt
(posted 2020-10-20 13:02:28.06) I think you need a way to make this into a shutter beam dump. Adding a beam tube alone is not sufficient. You need absorbent surface on the shutter to avoid specular reflection off the black anodized surface and low incident angle internal reflection from the inside of the beam tube. Internal baffles correctly placed would help. asundararaj
(posted 2020-10-22 04:43:54.0) Thank you for the valuable feedback. I have passed your suggestion along to our internal forum for consideration in a future product. Lingtian Diao
(posted 2020-07-20 09:13:20.52) Hello throlabs!
What is the operation temperature of the SH1/M? YLohia
(posted 2020-08-06 08:57:12.0) Hello, thank you for contacting Thorlabs. The solenoid in the SH1 shutter can be used at up to 120 C. Please note that a high power laser can damage the blades before the solenoid reaches an equilibrium temperature with the blades. LIDT information is given on Page 2 of the product manual. Claudia Ruiz
(posted 2020-05-29 06:14:50.26) Hello,
I see on the timing specifications of the web spec sheet of the SH* shutter that the KSC101 is not compatible with a SH1 shutter model. But I am using KSC101+SH1 system, so I do not understand very well this note ... could you please explain?
Thank you in advance,
Regards,
Claudia asundararaj
(posted 2020-07-14 03:56:34.0) Thank you for your feedback. The SH1 is not compatible for use with the KSC101 as it would not be able to provide the power needed to operate the SH1. The SH1 has a larger coil resistance and the KSC101 does not provide enough power to meet the higher duty cycles specified for the SH1. The reduced power will affect the open/close timings as well. Jason Thompson
(posted 2019-12-06 07:10:15.643) Hi, we buy optics from you, but buy a safety shutter in from Lasermet - their MS20 I think. We want to block a 30Khz, 3W, dia.1.2mm, 355nm UV laser. This laser is integrated into a customer cell and has a duty cycle of approx 5 seconds, so shutter would be open for roughly 4 seconds an close for 1 second per cycle. We are seeing reliability issues with the current unit so I am looking at alternatives.
I saw your SH05 unit and would like to know more, with quote please. If you want to chat about the application +44 1656 678009 for my direct line. Thanks,Jason asundararaj
(posted 2019-12-07 09:04:30.0) Thank you for contacting Thorlabs. I will reach out to you directly to discuss your application. techsupport
(posted 2009-05-14 08:50:31.0) A response from Erin in Tech Support to Andreas: For keeping the shutter open for a long period of time we recommend using 10 volts as the holding voltage. If you have any further questions please let us know. andreas.buehler
(posted 2009-05-14 05:09:33.0) We want to use the shutter as a safety interlock. I am wondering, what kind of generator to use i.e. what amount of current and voltage to keep the shutter open.
Thanks
Andreas Laurie
(posted 2009-03-20 12:31:18.0) Response from Laurie at Thorlabs to larrs-erik.nilsson: Thank you for your feedback. The SH05 shutter vane is made of anodized aluminum, so it should be suitable for handling and blocking the amount of power you suggest. Generally, shutters are not placed at the focal point of a light source; under such conditions and with sufficient power, the shutter vane will heat up. Laser powers in excess of 1000 W with a beam diameter of 0.2 mm is generally necesssary to cause burning or cutting. We do not have any lasers in our facility powerful enough to promote any ablation or damage. For high powers, it is advisable (for safety reasons) to periodically check the vane for any damage. If you have additional questions, please let us know. larrs-erik.nilsson
(posted 2009-03-20 07:28:45.0) We would like to use this product as a safety intelock to frequency doubled YAG-laser.
Will it sustain continous operation at:
532 nm
20 mJ/puls (10 ns)
100 Hz
Looking forward to your answer
Sincerely
Lars-Erik Nilsson jlm
(posted 2009-03-10 09:40:59.0) We want to use the TSC001 Shutter Controller in a prototype, ideally we would like to place the controller in a closed package and use an external trigger signal, unfortunately the “Enable” bottom must be pressed at power on. Is there any way to circumvent this problem? Laurie
(posted 2009-02-26 14:51:56.0) Response from Laurie at Thorlabs to benoit.mangote: Thank you for your interest in our SH05 shutter. The shutter vane is made of .05" (2.54 mm) anodized aluminum. There is no specific damage threshold value. Significant power may ablate the anodized surface on the aluminum. If your incoming laser beam can cut aluminum (typically a focused > 500 W CO2 laser ) then this shutter cannot be used. The shutter vane can be easily replaced, although weve never seen damage to it due to burning. For most applications, the laser beam at the location of the shutter is not focused. benoit.mangote
(posted 2009-02-26 09:17:57.0) What is the damage threshold of the SH05 ? Laurie
(posted 2009-02-23 08:05:47.0) Response from Laurie at Thorlabs to jwsickler: You are correct that the SH05 will not be suitable for you application. You could try an optical chopper. The description can be found via this link: http://www.thorlabs.com/NewGroupPage9.cfm?ObjectGroup_ID=287. If you choose this route, your blocked/unblocked durations will be identical. Please let us know if you have additional questions. jwsickler
(posted 2009-02-20 16:58:55.0) Interested in the capabilities of this shutter for modulating a 1 kHz repetition rate high power (up to 1 W) ultrafast pulse train, ideally with the capability to select every other pulse (i.e. 500 Hz modulation). From what I understand, this shutter can only cycle at up to 10 Hz, 25 Hz in bursts, and would not serve my needs. Is that correct? If so, are there any other solutions you can suggest? Tyler
(posted 2008-05-21 08:43:43.0) Response from Tyler at Thorlabs to hansknec: We have not tested the SH05 shutter to determine the damage threshold. I can tell you that the shutter blade is made from 1.6 mm thick black anodized aluminum. Please consider contacting one of our application engineers to discuss your intended application. Since we use this product in our own research labs, we might have used the product in a similar situation to your application. hansknec
(posted 2007-10-29 09:14:00.0) Dont you think it would be appropriate for you to show the beam power handling ability? Wavelength? Power? |


Click to Enlarge
Figure G1.1 シャッタSH05R(/M)をコントローラKSC101で駆動した時の開閉時間の測定例。シャッタの開口部をコリメートされたLED光でオーバーフィルの状態にし、シャッタの開閉時における透過光量を測定しました。
- 開口:Ø12.7 mm
- シャッタが閉じる時間(90%から10%まで)
- コントローラSC30: 6.5 ms(典型値)
- コントローラKSC101: 8.0 ms(典型値)
- SM05レンズチューブに対応するSM05ネジ付き開口部
- 初期位置:閉
- コントローラSC30およびKSC101に対応(どちらも下記にて別売り)
光学ビームシャッタSH05/Mでは、Ø12.7 mmの開口部を1枚のブレードがスライドします。シャッタが閉じるまでの時間は、開口が90%から10%まで閉じる時間として定義され、その典型値はコントローラSC30で駆動した場合は6.5 ms、コントローラKSC101で駆動した場合は8.0 msです。Figure G1.1は、光シャッタSH05R/MをコントローラKSC101で駆動した時の開閉時間を測定した例です。仕様の詳細については「仕様 」タブをご参照ください。
シャッタの開口部の両側にはSM05内ネジが付いており、当社のSM05 レンズチューブを取り付けられます。また、シャッタ筐体の側面と底面にある2つのM4タップ穴を使用して、ポストを取り付けることもできます。
開口の中心から開くタイプのブレードが必要な用途向けには、5枚のステンレス製ブレードを用いたコントローラ付きØ12.7 mm(Ø1/2インチ)ダイヤフラムシャッタもございます。

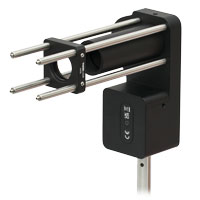
Click to EnlargeFigure G2.1 SH1/MにはSM1レンズチューブおよび30 mmケージシステムの取り付けが可能です。
- 開口:Ø25.4 mm
- シャッタが閉じる時間(80%から20%まで) コントローラSC30: 10 ms(典型値)
- SM1レンズチューブに対応するSM1ネジ付き開口部
- 初期位置:閉
- コントローラSC30(下記にて別売り)に対応
光学ビームシャッタSH1/Mには、Ø25.4 mmの開口部を1枚のブレードがスライドします。シャッタが閉じるまでの時間は、開口部が80%から20%まで閉じる時間として定義され、シャッターコントローラSC30(下記にて別売り)で駆動した場合10 msです。こちらの光学シャッタはコントローラKSC101には対応しませんのでご注意ください。他社製のコントローラについては、「仕様」タブのBeam Shutter Specifications表のソレノイドのパワー要件内であれば、ご使用いただけます。詳細については、マニュアルのChapter 4をご参照ください。
シャッタの開口部の両側にはSM1内ネジが付いており、当社のSM1 レンズチューブを取り付けられます。SH1/Mにはポスト取付け用のM4タップ穴が3つと、30 mmケージシステム用部品を取り付けるための#4-40タップ穴があります。
開口の中心から開くタイプのブレードが必要な用途向けには、5枚のステンレス製ブレードが付いたコントローラ付きØ25.4 mm(Ø1インチ)ダイヤフラムシャッタもございます。

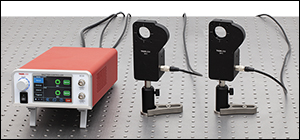
Click to EnlargeFigure G3.1 シャッタ用コントローラSC30は、当社の電動シャッタを同時に2台まで操作できます。
- SHおよびSHBシリーズシャッタに対応
- LabVIEW™、LabWindows™、USB、BNCにより、ローカル操作とリモート操作が可能
- ミリ秒レベルの間隔で反復する開閉シーケンスのプログラミングが可能
- LCD前面パネルにシャッタの状態が確認できるステータスインジケータ
- 当社のビームシャッタ接続時は安全アラーム付き
シャッタ用コントローラSC30は、当社の光学シャッタSHおよびSHBシリーズを簡単に制御するためのインターフェイスとしてお使いいただけます。 シャッタは、ユニット前面のボタンで最大2台のシャッタまで手動で操作が可能です。また、背面の外部トリガ用のBNC入力端子、他の装置との同期用のBNC出力端子、PCによるリモート操作用USB 2.0 Type-B端子(USB 2.0 Type-A - Type-Bケーブルが付属)があります。前面パネルのディスプレイは、各シャッタのEnableの状態と、シャッタが開いているかどうかを表示します。また、Lock/Unlockのボタンにより、シャッタを開けるためのアクションを有効・無効にできるため、レーザ用途で求められる安全性を確保できます。設定が有効になっていれば、背面パネルの2.5 mmモノフォノジャックを介した安全インターロックがすべてのシステムのコマンドをオーバーライドし、シャッタを閉じます。インターロックシステムが作動したときに機器の再始動をするには、Lock/Unlockのボタンを押す必要があります。
見やすい前面パネルのLCDによって、LabVIEWやLabWindowsのソフトウェアパッケージと同じコマンドにアクセスできます。単純なシャッタの開閉動作以外に、わずかに10 msの間隔であっても反復する開閉シーケンスが設定可能で、前面パネルのボタン、TTLパルス(+5 V)やUSBを介したPCコマンドで始動可能です。もう1つの方法として、シャッタの開閉をBNC端子から供給される外部電圧の立ち上がりエッジや立ち下がりエッジと同期させることもできます。
このシャッターコントローラのBNC出力端子は、分解能1 ms、精度0.1 msの独立型デジタル遅延発生器としての機能も果たします。

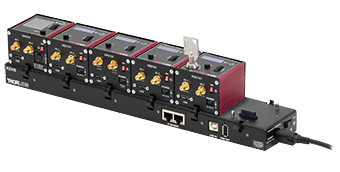
Click to EnlargeFigure G4.2 イーサネット&USBコントローラーハブKEH6(別売り)に取り付けたK-Cubeモジュール
- 手動操作、またはUSBやSMA接続によるリモート操作
- Kinesis制御用ソフトウェア一式(詳細は「Kinesisソフトウェア」のタブをご覧ください)
- ミリ秒レベルの間隔で反復する開閉シーケンスのプログラミングが可能
- 手動コントロールパネルとデジタルディスプレイにより、モードの選択とオン・オフ時間制御が可能
- セーフティーインターロックジャックとEnableキースイッチ
- シングルチャンネル用電源ユニットは別売り
- 複数ユニット操作用USBコントローラーハブ(別売り)
K-Cube®シャッターコントローラKSC101は60.0 mm x 60.0 mm x 49.2 mmと小型のコントローラで、シャッタSH05R/M用に設計されています。コントローラはデジタルシグナルプロセッサ(DSP)内蔵によりフレキシブルな操作モードが多数あります。詳細は「仕様」タブをご覧ください。この組込ソフトウェア機能は、ユニット上のメニューボタン、ディスプレイや制御ホイールの使用、DSPの指定時間動作の使用、サードパーティ機器からの外部トリガ信号の使用などにより、ソレノイド機器の制御を可能にします。トリガ出力端子(初期設定はTrigger 2)で複数のK-Cubeコントローラを接続し、マルチチャンネルシステムの同期が可能です。
KSC101には3.5 mmステレオジャック接続型のセーフティーインターロック機能が内蔵されています。この機能を無効にするための短絡コネクタが付属します。また、付属の3.5 mmのステレオコネクタを使用して、カスタム仕様の安全回路を製作することができます。コントローラでシャッタを開けるには、この回路を閉じる必要があります。コントローラにはまた、レーザの安全基準を満たすため、シャッタの開閉を有効または無効にするキースイッチも付いています。
上面のデジタルディスプレイは付属のKinesisソフトウェアパッケージと同じコマンドにアクセス可能です。単純なシャッタの開閉動作以外に、最短15 msの解放時間で開閉する繰り返しシーケンスが設定可能で、上面のコントロールパネル、TTLパルス(+5 V)、USB 3.0接続を介したPCコマンドのいずれかで操作できます。
USB接続によるプラグアンドプレイで、当社のKinesisソフトウェアを使用したPC制御による操作が簡単に行うことができます。詳細については、「Kinesisソフトウェア」タブをご覧ください。 KSC101には長さ1.5 mのA-MicroBタイプのUSB 3.0ケーブルが1本付属します。
電源の選択
必要な電源(シングルチャンネルまたはハブベース)は、その用途とお客様が対応可能な電源をお持ちかどうかによります。そのような理由と当社の環境イニシアチブの方針により、当社では電源を別売りとしています。
多軸のモーションコントロールの用途では、コントローラーハブKEH3またはKEH6をご使用になると、複数のユニットを1台のPCに接続することができます。KEH3は最大3台まで、KEH6(Figure G4.2参照)は、最大6台までのK-Cubeコントローラがお使いいただけます。
コントローラKSC101に対応する電源については下記をご覧ください。KSC101についての詳細は、製品紹介ページをご参照ください。

Click to Enlarge
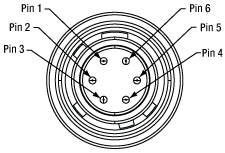
Figure G5.2 Hirose製コネクタ オス型
Click to Enlarge
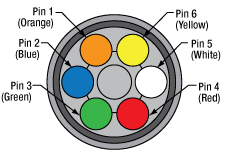
Figure G5.1 ワイヤの色とピン番号
- 6ピンHirose製コネクタ付きケーブル、両端オス型
- シャッタとコントローラを接続するための交換用ケーブル
- ケーブルを切断して被覆を剥ぎ、独自のアプリケーション用に使用することも可能
- シャッタに独自のワイヤを接続するためのブレイクアウトボックス付きケーブルHR10AD1もご用意
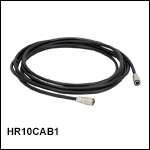
HR10CAB1は、両端に6ピンのHirose製コネクタが付いた長さ3.0 mのケーブルで、このページに掲載されているシャッタとコントローラを接続するのに使用できます。
独自にはんだ付けをして接続したい場合には、Hiroseコネクタ付きケーブルを任意の長さで切断し、一方はコネクタ付き、もう一方は裸線にしてお使いいただくこともできます。Figure G5.1は6本の色付きワイヤとコネクターピンの関係を示しています。この図を参照すれば、ケーブルを切断して様々なカスタム用途に組み込むことができます。なお、これらのワイヤはケーブル内で交差するため、ピンの識別には絶縁カラーをご利用ください。
HR10CAB1の詳細は、製品紹介ページをご参照ください。
独自の構成でシャッタを駆動する場合には、当社のブレイクアウトボックス付きケーブルHR10AD1をお使いいただくと、はんだ付けをせずに裸線を簡単に接続できます。
 Products Home



 ズーム
ズーム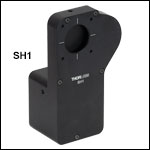



 シングルブレードビームシャッタ